Every freediver strives to improve their breath-hold time, and doing so requires diligent training as well as an understanding of what saps your oxygen the quickest. Unfortunately, rationing your oxygen isn’t as intuitive as rationing something tangible like food, where you can easily see how and feel much you have left.
It’s common sense that performing any movement consumes oxygen. However, even without intentionally moving any muscle, your internal organs will always be functioning and consuming oxygen, particularly your heart and brain. If you can’t keep your heart rate as low as possible, then you will use up your oxygen supply faster and limit your breath-hold duration.
Furthermore, if you start panicking or stressing out while underwater then your heart rate will dramatically increase even if your external movements haven’t changed. Being in a panicked state can also cause you to not think clearly, to move erratically and waste energy, all of which will result in decreased breath-hold time and increased risk of a blackout.
As such, there are many questions we hope to answer in this article. We’re going to cover how to increase breath hold for freediving, top factors that can drain your oxygen, ways to stay calm, our recommended training style, the dangers of hyperventilation, and what happens to your body as you hold your breath for too long.
Basic Safety Rules for Freediving
Before we get into the nitty-gritty of how to increase your breath-hold for freediving, we need to go over some basics because even while training things can go wrong.
Any sport where you restrict your breathing, such as freediving and spearfishing, is inherently risky due to the risk of blacking out and drowning. Each time you dive underwater, you will be subjected to mother nature’s whims and be at her mercy.
By erring on the side of caution, you can overcome many of these obstacles and reduce your chances of blacking out. The most important safety rule of freediving and spearfishing is to be prepared for emergency situations. Here’s how you can do that.
Keep a Dive Log
Even though you are trying to improve and push past your limits, first you need to have a good understanding of what your current limits are. It is important that you keep a dive log of each attempt so that you have a baseline for approximately how deep you can dive and resurface without issues. Then from that baseline, you can begin to push your limits.
Be very thorough and record everything you can about the dive. Log the location, what kind of equipment you were wearing, if you were diving in freshwater or saltwater, how many dives you attempted, how long you rested in-between each dive, the duration of each dive, the depth of each dive, and any other information you think is pertinent.
Without a step-by-step and thorough process like this, a beginner may misjudge what they are actually capable of and find themselves gasping for air while still dozens of feet underwater. Have the patience and work ethic to make gradual progress in your freediving attempts, and soon you will have enough experience to blow past your limits.
Never Dive Alone
Always bring at least one other person with you whenever you head out into the water. During apnea, there is a possibility that you can blackout. Without a partner to monitor your progress, if this happens you will almost certainly drown.
Hyperventilating (and why you shouldn’t do it)
When our body accumulates too much carbon dioxide, it will send out a signal to warn you that you need to breathe. Being aware of these warning signs is crucial so that you know when you’re about to black out.
Many freedivers use a breathing technique known as hyperventilating where they deeply inhale and exhale rapidly to fill their body with more oxygen than normal before beginning their dive. This can trick your body into not sending a signal to your brain to remind you that you need to breathe soon.
In effect, hyperventilating makes it so you will not be able to tell when you are on the verge of a blackout which puts you most at risk of a sudden blackout. We do not recommend the practice of hyperventilating for freediving or spearfishing.
(Skip to the section on the Risks of Hyperventilating by clicking here).
Quit Smoking
Easier said than done, right? However, even temporarily putting a hold on smoking leading up to a freediving event may help you recover enough lung function to make significant progress. If you are a smoker and a freediver and want to increase your breath-hold times, it’s quite obvious what the solution is.
Dry Static Apnea Training
Training in the water poses the same risks as if you were competitively freediving. At any point you could lose consciousness, choke on water, suffer a medical emergency, or any number of unexpected things.
That is why you should consider dry training. By taking the proper precautions, you can increase your breath hold for freediving with dry training in a safe and more convenient environment.
Dry Training vs. Wet Training
Dry training is exactly what it sounds like: training your breath-hold on land, whereas wet training is done in the water. Pretty intuitive. Of course, nothing can be a perfect substitute for wet training when it comes to providing the most realistic conditions for freediving and spearfishing.
With that said, dry training has its benefits, namely that many professionals use it to increase their lung capacity and to enter the ideal headspace for their dives, all within the comfort and safety of dry land. Its popularity is due in no small part to the fact that it can be done without a training partner since there is no risk of drowning.
How Dry Static Apnea Will Improve Your Freediving Breath-Hold
We need to come clean here. Dry static apnea training won’t help your body adapt to freediving deeply. Only plenty of experience actually freediving can do that. Additionally, dry static apnea does NOT strengthen your lungs, only sprints, lung stretches, or an Air Restriction Device can do that. So why are we even talking about this?
Dry breath-hold training is effective for training your mind and body to withstand the obstacles that freediving breath-holds will bring up. By focusing on apnea training, you can improve your diaphragm contractions, overcome the urge to breathe by boosting CO2 tolerance, handle low oxygen levels, and steel your mind to remain calm no matter the situation.
It’s probably the best way to train your breath-hold without the risks associated with freediving.
How to Do Dry Static Apnea Training
(Disclaimer: While relatively safe, dry static apnea training involves holding your breath which can result in blackouts and injuries sustained due to blacking out. The advice we are providing is, to the best of our knowledge and experience, correct and reasonably safe to do. However, you follow this advice at your own risk. Always perform static apnea training on a flat, soft surface such as a bed or padded floor.)
Step 1: Lay flat on a bed or the floor. If you are on the floor, we recommend setting up a yoga mat or putting some kind of padding to make the experience more comfortable.

Step 2: Listen to some relaxing music; you want to calm yourself down and also have something to focus on so that you can be distracted from the discomfort of your body’s urging you to breathe. Don’t play upbeat or loud music as this can cause your heart rate to increase.
Step 3: Get a timer and set it to the times listed in the CO2 table. Don’t try to do the counting yourself; while it would make a good distraction, humans are notoriously bad at counting time accurately, especially when they are slowly suffocating.
Step 4: Perform your pre-dive breathe-up. The standard method is to perform two-minutes of slow breathing, where you exhale for twice as long as you inhale. So if you inhale for five seconds, make sure to exhale for ten until two minutes have elapsed.
Step 5: With the breathe-up complete, it’s time for the final breathing preparations. Fully exhale all of the air in your lungs. Then do one long inhale until your lungs are nearly full (say, 95%). Going all the way to 100% is considered bad practice because of how uncomfortable it feels and it is likely to impair your concentration.
Step 6: Hit play on your music device and also make sure the timer is ticking, you’re on the clock now.
Step 7: The entire time during apnea, you are trying to limit your heart rate by remaining as calm as possible. If you’re not sure how to do that, here’s a good starting point. First, you need to associate the underwater environment with something positive.
Picture yourself in a picturesque lake, or in the tropical ocean of Hawaii. Next, imagine yourself diving to the bottom to explore. Feel the water against your skin, fish swimming within reach around you, underwater flora all around you. Are you feeling relaxed yet?
Step 8: No matter how good you are at distracting yourself, as you approach your limit the natural contractions urging you to breathe will no doubt get more violent. At this point, tuck your chin down to your chest.
This not only feels comfortable, but it can protect your face when diving deep. Also, no doubt the contractions are causing you to panic a bit and increasing your heart rate.
To maintain a low heart rate, understand that the convulsions aren’t actually hurting you and that they will happen naturally (assuming you haven’t hyperventilated). Once you’ve made peace with this fact it will give you peace of mind and prevent further panicking in the future.
Step 9: As you near the end of your breath-hold, picture yourself successfully returning to the surface.
Step 10: The imagination part of the exercise is mostly over. Open your eyes, and follow up with 5 hook breaths. If you want, you can keep on imagining yourself in the water because this breathing technique is exactly the thing you will be doing during the real thing.
Hook breaths are a special way to breath that you should do after resurfacing from each dive (not before). It rapidly supplies your bloodstream with oxygen faster than regular breathing, which can help prevent surface water blackouts.
To perform a hook breath, you inhale air like normal, but then keep the air in your lungs while exerting a downward force using your abdominal muscles and diaphragm. This raises the air pressure in your lungs and forces oxygen into your brain faster.
Try following a cadence of: inhaling for 1-2 seconds, then holding your breath and pushing down with your diaphragm and abdominals for 1-2 seconds, exhale, and repeat 3-5 times.
Congratulations, you’ve successfully completed a dry static breath-holding training session. Using this visualization technique and with the help of music, you should be able to train your mind to stay calm and keep your heart rate low. This should result in your breath-hold lasting significantly longer.
Soon, you will be able to last for a two-minute or longer dry static breath-hold right off the bat. Once you’ve reached a breath-hold spanning more than three minutes (which is doable after some practice), then your ability to stay underwater while freediving will have increased significantly as well.
CO2 Tables for Dry Static Breath-Hold Training
Without a structure to your breath-hold training, you won’t be as effective in achieving milestones. A CO2 table (carbon dioxide table) can give you an idea of a recommended breath-hold time to shoot for as well as how long to rest between each attempt.
The general structure of a CO2 table is laid out like this. There will be a column listing the apnea time to aim for. There will also be a column with the recommended breathing time as you prepare for the next set.
(The table below is structured around someone with a breath-hold of 3 minutes. A rule of thumb is the breath hold should be around 50% of your maximum limit and the training should only last for 8 cycles or sets).
| ventilate – 2:30 min | apnea – 1:30 min |
| ventilate – 2:15 min | apnea – 1:30 min |
| ventilate – 2:00 min | apnea – 1:30 min |
| ventilate – 1:45 min | apnea – 1:30 min |
| ventilate – 1:30 min | apnea – 1:30 min |
| ventilate – 1:15 min | apnea – 1:30 min |
| ventilate – 1:00 min | apnea – 1:30 min |
| ventilate – 1:00 min | apnea – 1:30 min |
As the breath-hold training session progresses, each subsequent set will have a shorter breathing period, while the apnea time remains the same. In other words, the sets will get progressively more difficult because you’ll have less time to get rid of the CO2 in your system and fully recover between sets.
This forces your body to get accustomed to apnea with some CO2 in your body. You will adapt and build a tolerance for CO2 so that you can get accustomed to the discomfort of being out of breath while underwater. CO2 tables will help you resist your urge to breathe by desensitizing your body to diaphragm contractions.
All of this will result in a more relaxed dive and superior breath-hold times.
Why Dry Static Apnea Training Instead of Other Methods?
Dry static breath-holds are the ideal training method for a couple of reasons:
Convenience. You don’t need any specialized equipment, supervision, or a pool. You can do it basically anytime you want, anywhere, and there’s no risk of drowning since you’re not even in the water. Furthermore, you don’t need to ask anybody to help you out which is a plus.
Safety. As the name suggests, this is a type of dry training which means you are not in the water at any time. Even if you push yourself too far with your breath-hold and lose consciousness, your body will start breathing again on its own and you’ll live. With that said, you should do the training laying down on a soft surface so that you don’t hurt yourself if you faint.
Disadvantages of Dry Static Apnea Training
Despite their advantages, dry static breath holds are not without their downsides. Since you’re not actually training in the water, even if you have an impressive breath-hold time on land, it doesn’t necessarily mean you’ll last as long underwater.
The purpose of dry static breath-holding is to help you get used to the uncomfortable effects that apnea causes your body. However, if you never get a chance to head into the water to freedive and measure your progress in the proper environment, then your body will not be as accustomed to underwater apnea as it could.
Furthermore, being underwater will trigger our Mammalian Dive Reflex which provides us with useful breath-holding benefits such as a naturally reduced heart rate and priority blood flow to our major organs. These factors make it hard to compare your apnea times on land compared to underwater.
Dry Static Apnea Training Frequency
Aim to do dry static breath-hold training 3-4 times a week. After a couple of weeks of successful training, you can expect an increase in your breath-hold times while underwater.
Training Your Lungs for Freediving

Mentioned above, dry static apnea training increases your CO2 tolerance and also serves as a relaxation technique to keep heart rate low, thereby decreasing oxygen consumption. It does not actually improve the strength of your lungs to inhale more air.
To do that, you need to perform sufficiently stimulating cardiovascular exercises, such as High Intensity Interval Training (HIIT), an example of which is sprinting at top speed for a few seconds, resting, then sprinting again, etc. You can also do lung stretching exercises like yoga.
Another way you can train your lung strength to inhale air more efficiently is with the use of an Air Restriction Device such as the Powerlung. Practice twice daily for five minutes each session and you can get stronger lungs in just a few days.
How to Equalize for Longer Dives
In order to be an effective spearo or freediver, you need to know how to deal with underwater pressure as you head further underwater. If you’ve ever been on an airplane, then you’ve probably experienced an increase in pressure on your sinuses or ears, almost to the point of pain.
Freedivers will need to work on their equalization techniques simultaneously with their static apnea training because both will benefit longer dives immensely. Before getting in the water, the first thing you should do is pre-equalize. After all, spending precious oxygen to equalize in the water is something you should limit doing.
The best way to equalize underwater efficiently and quickly is a method known as the Vasalva Method. You’ve probably already done this many times without knowing what it’s called.
To perform the Vasalva method, simply pinch your nose and try to exhale through it. This will pressurize your sinuses by forcing air through them so that you can continue diving without discomfort. By pre-equalizing before a dive, you save some energy by not having to do it in the earlier depths which can help you dive longer.
Rest Time Between Dives
Some divers have complicated formulas that they use to calculate the perfect surface interval between dives. We want to keep things simple, so here’s the only rule. You should rest at least three times longer on the surface compared to what you spend underwater. So if you spent 60 seconds underwater in your most recent dive, consider resting for at least 3 minutes before diving again.
This might sound excessive, however, the benefits are massive. Many experienced freedivers and Spearos will tell you that they swear by this rule, and that they have not experienced a single blackout over their years of diving. You can take the risk of resting less if you’re impatient, but it’s your life that you’re gambling.
Even with this knowledge in mind, it can be difficult to accurately estimate your surface interval. That is why you should consider investing in a dive watch. It’s a hefty sum of money but it’s worth it. Many beginner’s estimates are so dangerously off-base; they are at serious risk of blacking out.
What may seem like 3-4 minutes on the surface may, in fact, only be about 90 seconds. So either have a buddy track the time with a watch by the boat or invest in a dive watch. You can also use it to track dive time and depth, of course, however we urge you to pay the most attention to surface interval.
With sufficient practice, your depth and breath-hold time will surely increase, but it’s by being generous with your surface intervals that you can achieve this progress.
Wet Static Apnea Training

Another common training technique for freediving breath-hold training is wet static apnea. Apnea is described as a “temporary cessation of breathing.” Static means to lack movement. Put these terms together, and you can get a pretty good idea of what static apnea means: holding your breath while not moving.
Freedivers practice static apnea since it is a close approximation of being submerged in the water. You can practice the static apnea technique both in the water, and even on dry land.
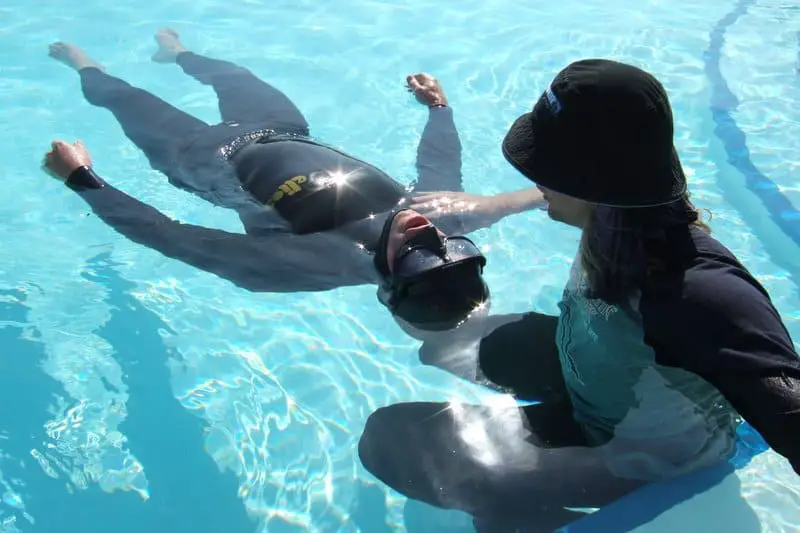
For wet training, a freediver will float along the water’s surface on their backs. What should naturally happen if the body is fully relaxed is eventually one will roll over and submerge their face underwater. The whole time, the freediver is concentrating on staying calm in a zen-like state, as if they were meditating while holding their breath.
A training partner will nudge the diver at set intervals, and the diver will perform a quick hand maneuver while keeping their body as still as possible. Once the diver is out of breath, they will record the breath-hold duration and go over what the partner can do to improve their times.
Static apnea training can be done dry as well. The differences are minor; the diver will lie on their belly on a flat surface and relax their body. Next, the diver will hold their breath and a partner will tap the diver periodically to ensure they are still breathing.
Whether it’s wet or dry training, both require a clear mind. Your brain will send warning signals to remind you to breathe long before your body runs out of oxygen. Only with experience can you know what your limits are and how far you can push yourself without blacking out. Relaxing the body is crucial for static apnea training since even slight movements will consume precious oxygen and limit how long you can dive.
What Happens When You Hold Your Breath for Too Long
For inexperienced freedivers, the thought of holding your breath for several minutes underwater seems unbelievable. The average person will reflexively want to breathe after just 20-30 seconds underwater. In this section, we’ll go over the whole process of what it’s like for a pro to hold their breath for so long, as well as the risks that this poses.
I’m sure you know that when you inhale, you take in oxygen and when you exhale, you release carbon dioxide. While freediving, you are not able to inhale any oxygen during a breath-hold. This results in a buildup of CO2 that should be exhaled, but instead accumulates in the bloodstream and lungs.
When sufficient CO2 has accumulated, your body will transmit a signal to the brain which triggers an urge to breathe. With enough training, you can inhibit these natural convulsions that your body is generating. This is dangerous because you are ignoring the warning signs that your oxygen levels are running low.
Some freedivers take it even further by allowing their body to go through a natural process known as spleen venting. First discovered by observing whales and seals in the wild, a spleen vent is when the body injects a reserve of oxygen into the bloodstream. In humans, this is not a commonly occurring event, typically only occurring when one is in shock or about to suffocate.
Researchers sometimes refer to the spleen as a biological scuba tank that may be the result of an evolutionary trait that mammals have. It stores up to 15% of the oxygen-rich blood in your system and acts as a natural reserve for emergency low-oxygen situations.
As cool as this sounds, this isn’t something you should rely on, nor is it some bountiful supply of fresh oxygen. By continuing to hold your breath and using up this reserve, your body will experience the next phase of suffocation.
Your brain consumes significant resources in order to function, and 20% of the body’s oxygen is used up to keep your brain running smoothly. When you lose too much oxygen, as a self-preservation mechanism, your brain will shut itself off to conserve oxygen.
The shutting down of the brain is known as a blackout, and blacking out underwater basically means certain death unless someone is around to rescue you. To avoid experiencing this, you must improve your lung capacity. Educate yourself and practice the techniques in this guide so that you can hold your breath for longer.
Risks of Hyperventilating
We all want to extend our bottom time in order to become the best freediver so we are all learning ways to increase our breath-hold. But at what cost? Obviously long breath-holds increase our risk of death; as one’s bottom time improves, the chances of a shallow water blackout increases in equal measure.
Hyperventilating is a breathing technique that many freedivers and spear fishermen practice to instantly increase their breath-hold time. By breathing in excess of the need that our body has for oxygen while exhaling as much CO2, you are hyperventilating.
This is most commonly done by performing rapid shallow breathing (similar to what you might see in a show or movie where a panicking character needs to find a brown paper bag to breathe into in order to calm down).
The benefit of this is an instant improvement in breath-hold time. The downside is it tricks your body into not sending out signals urging you to breathe. You could be mere moments away from a blackout and not feel any urgency to breathe. As such, hyperventilating is one of the most common ways divers experience a shallow water blackout.
The Importance of Relaxing Underwater
Don’t expect to be able to hold your breath underwater for several minutes at a time without months and years of training (or the help of a snorkel). Building up your breath-hold takes time and lots of practice. Furthermore, progress should be made slowly, since one misstep and you run the risk of drowning. But in essence, the key to how to relax underwater can be boiled down into staying calm and limiting your movement.
Whether you’re spearfishing or freediving, movements should be kept to a bare minimum. If you’re a Spearo, movement will reveal your presence to fish. Furthermore, moving your muscles requires oxygen, so the more you move the faster you have to resurface. As a freediver, each movement must take you closer to depth or to the surface. Panicking will cause you to move more frantically and make mistakes, which wastes precious oxygen as well.
Tips to Increase Breath-Hold For Freediving
We’ve gone over a lot of theory about how you can hold your breath for longer, but in this section we will go over some practical tips.
Reduce Your Heart Rate
Each time your heart beats, it consumes oxygen. It follows that a higher heart rate will use up oxygen faster. Before a dive, you need to decrease your heart rate, ideally, to below 45 BPM. Find a way for you to decrease your heart rate using whatever method works best for you, whether it is through meditation or doing slow and controlled breathing.
Meditating is quite simple; you don’t need to be some mountain guru or Buddhist monk in order to effectively meditate. Try this at home or in a quiet environment. Simply close your eyes and focus on performing slow, controlled breathing. See if you can enter a state where you are nearly semi-conscious, yet still aware of your surroundings, almost like an out-of-body experience.
Even if you don’t reach those levels of meditation, at the very least the controlled breathing should reduce your heart rate. Once you feel like you’ve calmed down, then you can begin to dive.
Pre-Equalize
Prior to a dive, pinch your nose and exhale to clear your sinuses. This will keep you pressurized for the initial stretch of the dive to conserve as much energy and oxygen early on (every little bit helps).
Controlled Movements
Remember your static apnea training. Every action you did was intentional, as was any inaction. Don’t deviate from what you practiced and try new techniques in the middle of a dive.
Your movements should be calm and performed perfectly. Keep in mind that your legs are the largest muscle group in your body and consumes a lot of oxygen. Each kick with the monofin must be as efficient as possible to generate thrust while keeping energy expenditure to a minimum. All of this is only possible if your movements are well-rehearsed and controlled.
When you reach the point of freefall, it will be easy to coast downwards while conserving plenty of energy. On the ascent, maintain a hydrodynamic body posture and continue kicking efficiently. Once you’re 15-20 ft. from the surface, you can begin to relax as your natural positive buoyancy takes you to the surface.
Stay Flat
Undulate your body only as much as you need to in order to generate thrust, but otherwise stay as flat as possible. Bending too much can shift or compress your internal organs in such a way that is not conducive to holding your breath for as long as possible. In other words, staying flat will help you to avoid certain variables that could potentially limit your freediving potential.
Wear Properly Fitting Gear
If your weight belt or wetsuit is too tight, for instance, it can constrict your body too much and make it difficult for you to get a full breath of air by the surface. You need gear that is flexible, such as a rubber weight belt, so that you do not restrict your diaphragm to allow you to store as much oxygen as possible.
Know Your Limits
We’ve mentioned this several times in this article, but it is so crucial to know how far you can push yourself. You cannot truly know your limits without lots of practice and keeping a log of each dive attempt. Without a baseline for you to reference, each dive attempt will depend on too much guesswork.
By knowing approximately how deep you can dive on average as well as your personal bests, you can get a feel for whether a dive was successful or not. You can also decide whether you are feeling up to setting a new record that day, or if you should resurface and rest up.
By having a good understanding of your limits, you’ll know when to push yourself and when to ease up on the training. This makes making progress on your breath-hold training while staying safe so much easier.