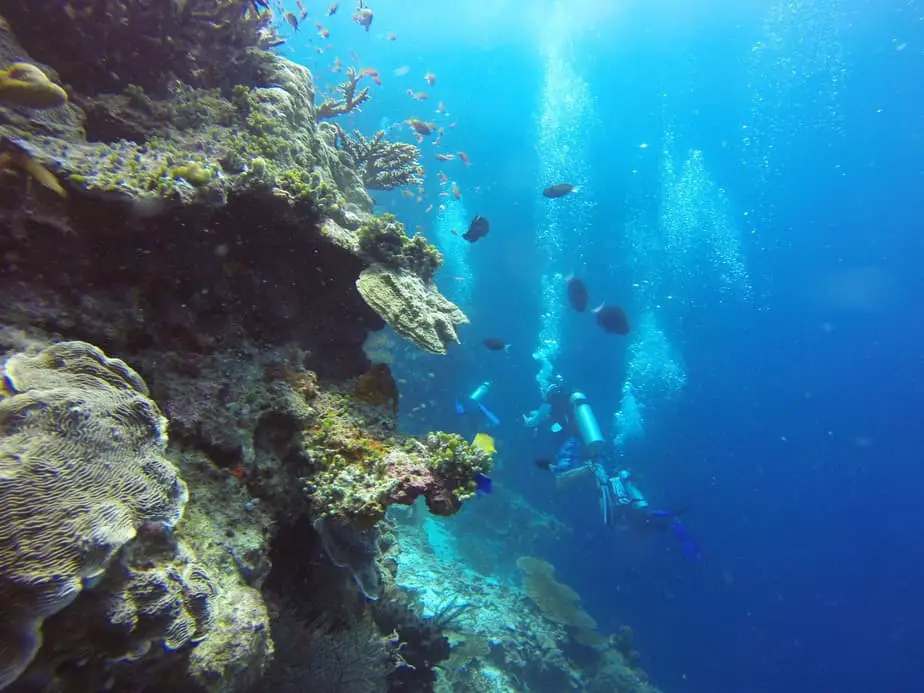
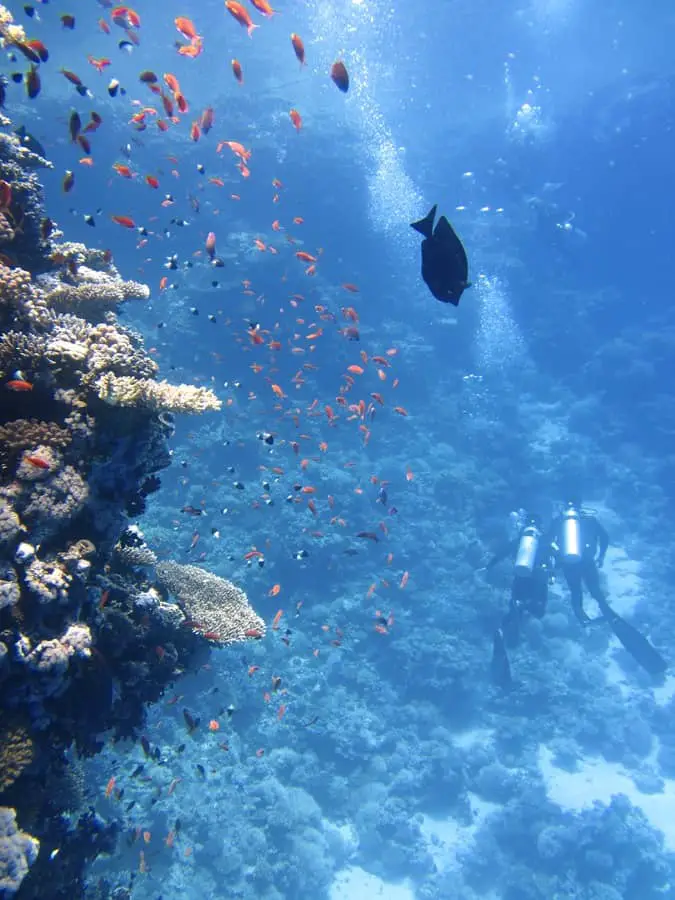
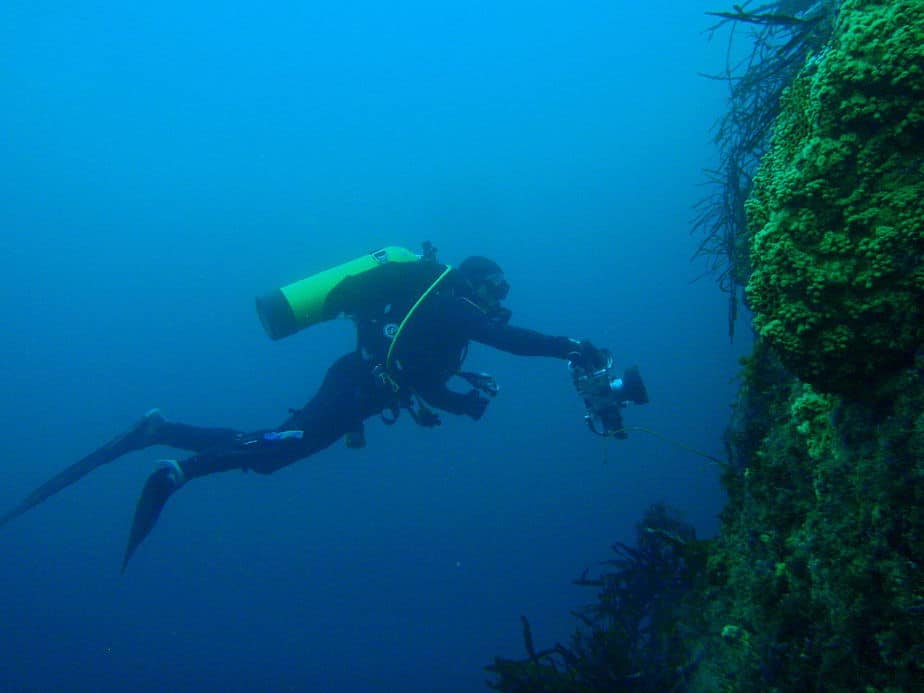
Not all dive sites have sloping reefs or flat bottoms. In some areas of the world, the main attraction of the dive site are submerged coral encrusted walls that form part of, or perhaps all of, the dive site. Walls can differ in size, from being only a few meters high to hundreds of meters downwards. No two walls are the same, as each one is packed with numerous ledges, crevices, overhangs, sea fangs, and different coral species. Each time you wall dive, you will be amazed at how beautiful a wall that is adorned with brilliantly colored sponges and coral, towering over you like a fortress or a skyscraper is.
For many divers, wall diving can seem like an intimidating experience because you may not necessarily be able to see the bottom, and beyond the wall is an endless expanse of empty blue. It’s probably the closest feeling you can get to being an astronaut floating in space with little else around you. With a few helpful wall diving tips and techniques, you will be able to gain the confidence you need to explore more wall dive sites and environments. There, you will see different and often new aquatic life, improve your skills and become a better diver overall.
What is wall diving?
Wall diving, sometimes referred to as shelf diving, is when a diver explores a vertical wall of coral in open waters. At some dive sites, the wall can be found as shallow as 3-6 ft deep (1-2 m). Often wall dives start at a depth of around 40-60 ft (12-18 m) deep. What makes wall diving challenging is how deep you need to go to experience it.
For recreational divers, wall diving can be challenging. In addition to the depth requirements, they are sometimes spooked by the lack of an ocean floor which can be disorienting for people who like to use it as a marker to gauge their depth. When they stare down and see a never ending abyss, it can evoke a feeling of dread.
When you’re just starting out, you should stick with wall dives that are relatively shallow, i.e. they still have flat bottoms and sloping reefs. Some wall dives literally have no floor for you to see or stand on. Some walls are tiered like a terraced garden, however you can’t expect this for every coral shelf, and you likely don’t want to disturb the corals on the wall by resting on them either.
What to expect from off the wall diving
No two walls are the same
You might be thinking: if you dive one wall, you’ve dived them all. That simply isn’t true. Sure, they may have similar characteristics, but each wall has its own features, residents, and personality. The biggest difference between walls is the depth in which the wall begins. You also have to consider its distance from shore, since they are often found in open waters.
Other than some outliers, most walls in the Caribbean start from the 40-60 ft (8-12 m) range, and they are found a couple of miles from the shore. Thankfully, they display some contours and slopes. One exception is the Great Wall (no, not of China) off Little Cayman’s north coast. That wall starts 15 – 20 ft (5 – 6 m) deep, is close to shore, and is basically a vertical sheer. Diving the Great Wall is like floating next to a skyscraper that is covered with marine life.
Additionally, walls in the South Pacific tend to be shallower and closer to the shore. For example, in Papua New Guinea and Indonesia, the lip of many wall dive sites are only 1-2 m (3-6 ft) beneath the surface and accessible without a boat. However, don’t get fooled; the bottom of the wall descends hundreds, perhaps thousands of feet into the depths.
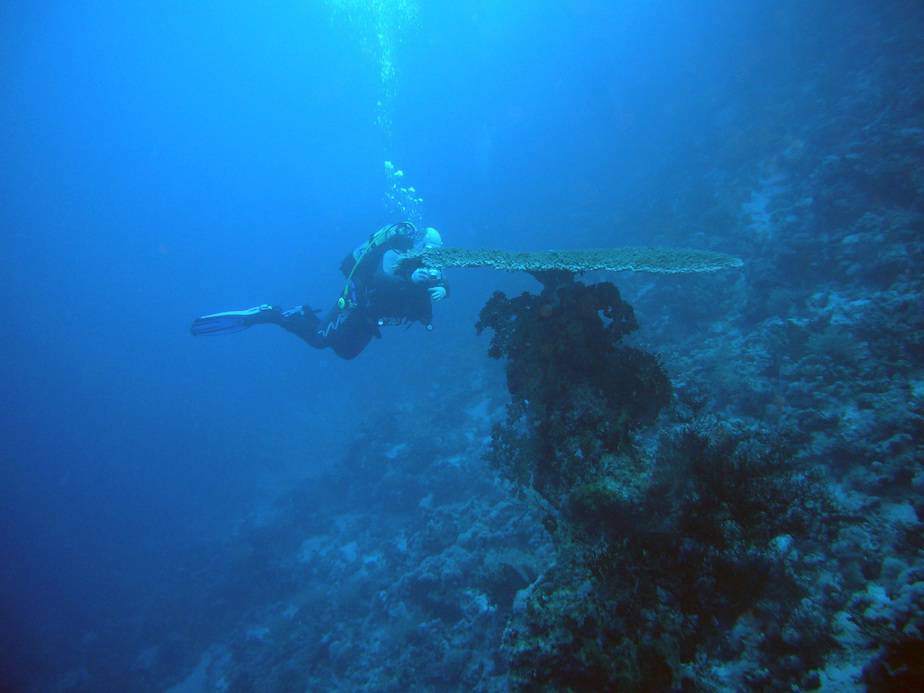
Next, the contour and sheerness of a wall varies from location to location. For example, dive sites like the Great Wall are nearly perfectly sheer, with crevices and holes that can only be accessed by the small marine creatures residing along the walls. Other walls may hide a maze of tunnels, crevices, and swim-throughs that may be too small to navigate, or big enough for divers to explore.
Walls are often stair-stepped with terraces protruding every 30 m (100 ft) deep. They range from being moderately sloped to benign nearly vertical. Every wall has a unique personality and structure which makes each wall dive feel novel.
Although wall diving is all the rage in tropical diving locations, North Americans can enjoy off the wall diving in their own countries. Sheer vertical facades can be found almost everywhere, including in western countries. To facilitate this, just about every former stone quarry that has been transformed into a dive site will have at least one wall.
Generally, the perimeter of the quarry is a vertical face that starts 3-5 m (10-15 ft) below the surface and extends all the way to the bottom. The variety of marine life and visibility of the dive site may not be may not be as enjoyable as wall diving in tropical areas, but quarry walls are still beneficial if you want to practice wall diving techniques.
Aquatic life on or along the wall
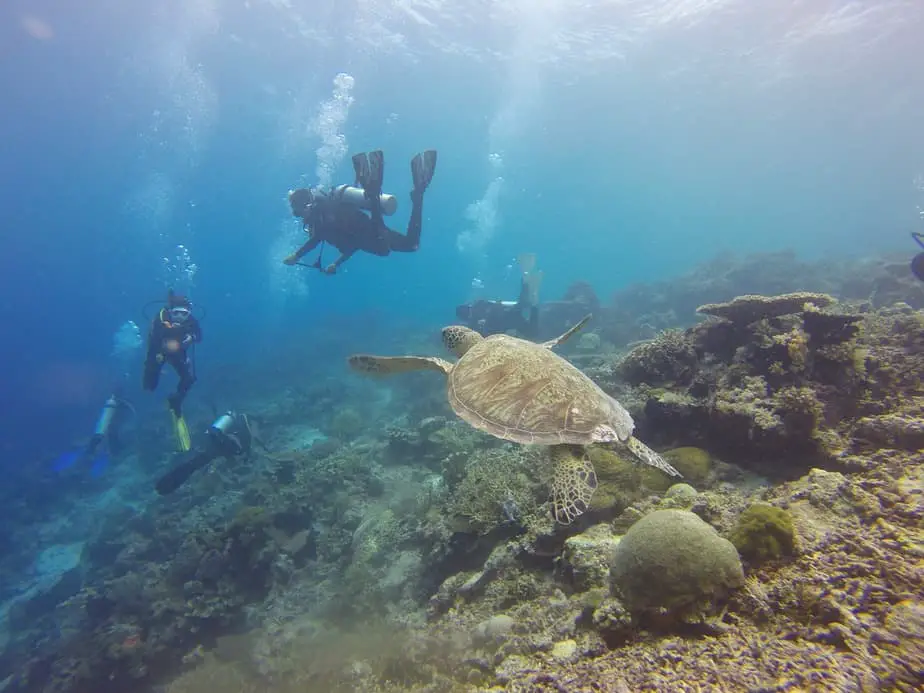
One of the main reasons to dive the wall is to see the marine life that takes up residence in it. The wall and the reef above it act as a barrier between the deep, vast ocean and the shallower, safer water on the shoreward side. Pelagics can often be found surfacing from the depths to snack on the smaller fishes that live in the shallower areas.
Most dive sites are home to manta rays, eagle rays, sharks, large tuna, ocean triggerfish, and even the occasional whale shark casually cruising by in search of its next meal. You never know what you might see whenever you brave the deep and distant blue, but it’s always exciting to see what pops up.
The wall itself is honest to a plethora of smaller creatures. The passageways of tiny cracks, crevices, and tunnels provide ample hiding places and shelter for mollusks, tunicates, crinoids, crabs, and other invertebrates of various shapes and sizes. Of course, you’ll also find coral and sponges. In the South Pacific, you can find leffish, frogfish, and lionfish that live in the ledges and small crevices.
Most walls are so heavily covered in marine life that you can spend a significant portion of your dive just looking at a small 3-5 sq m section of the wall for all the tiny creatures that come and go. With that said, make sure to occasionally look over your shoulder or you’ll miss the large fish passing by behind you.
Wall diving tips
What skills do you need for wall diving? You do not need any unusual or special skills to wall dive, however you do need to be competent at the basics. Diving the wall is not recommended for an absolute beginner or a rusty diver. If this applies to you, consider getting a few more dives under your belt and focus on mastering buoyancy control by taking this course, or consider taking the reactivate course for a refresher.
In addition to that, divers must also monitor their depth and bottom time carefully. Since wall diving often has no bottom to use as reference, it’s common for divers to descend much further than they intended. This puts them at risk of exceeding their bottom time faster, dealing with nitrogen narcosis, and an increased risk of decompression sickness due to the depth.
Thus, a thorough understanding of not just their dive computer, but also good ol’ dive tables, as well as the ability to perform slow, controlled ascents and safety stops are all crucial. Many divers enroll in specialty diving courses (we mentioned a couple above) to ensure they are sufficiently prepared. We’ll go over each area you should be focusing on to have a better wall diving experience.
Buoyancy control
Most walls extend hundreds if not thousands of feet underwater, making them effectively bottomless for the average diver. Despite the water being quite clear, the bottom of the ocean is so far away that it just looks like an endless blue abyss when you look down. This disorients divers who are used to seeing the bottom and using it as a reference point for how deep they are.
When descending during a wall dive, divers need to be cognizant of their current depth and how fast they are descending, particularly if you need to exceed the max sport-diving limit of 40 m (130 ft). Considering many walls start dozens of feet underwater and it’s not easy to tell how deep you currently are unless you’re watching your depth gauge like a hawk, it’s easy to overshoot that depth.
On top of that, since you will become more negatively buoyant as you descend, you must be vigilant about adding air into your BCD to slow your descent and establish neutral buoyancy otherwise this is yet another potential risk of overshooting your depth.
To reduce the risk of diving deeper than the planned maximum depth, wall divers generally slow their descent at least 3 m (10 ft) before reaching their desired depth, if not even before that. This can be done by inflating your BCD with short bursts of air. You must do this early enough because it takes a few seconds for the effects of adding air to be realized.
If you wait too long before adding your, you may panic and add too much at one time. Then, you will have to be prepared to vent some of the excess air because you may find yourself ascending when you were planning on descending. Once you have reached neutral buoyancy at the desired depth, you should switch from a vertical descent position to horizontal trim and explore the wall laterally.
Dealing with drifts
It’s not uncommon to feel a mild or swift current along the walls, so you may be lucky enough to drift dive in tandem with a wall dive. Simply let the current take you to the surface where the boat can pick you up. If you’re starting from an anchored boat, you can begin your dive by entering the current and exiting it once it’s taken you deeper. During the second half of your dive, you can enter the current again and drift back to the starting point.
Some things to pay attention to when returning to the starting location of the dive in a drift is that many times the boat is not visible from depth. Thus, it’s easy for you to drift past the exit location without realizing it. Then you’ll be in a bit of a pickle because you must swim against the current in order to reach the boat or let the current take you far away and wait for the boat to pick you up. Thus, at the start of the dive, take a good look at your starting location and keep that mental picture in your mind so you don’t miss it during your ascent.
Multilevel diving
When diving the wall, the deepest part of your dive should be reached first. Wall divers will descend to their maximum planned depth, spend some time there, then progressively ascend to shallower depths as they explore the wall. What makes wall diving so fun is that there’s plenty of exploration for you to do at any depth, even as you’re ascending.
Multilevel diving is perfect for wall diving. If you are in a wall diving area, ask your operator if they offer training for the PADI Multilevel Diver course. There, you will learn about the technicalities of dive computers, dive tables, and dive planning in general.
When using a dive computer or following multilevel diving theory, this progressively shallower wall-diving approach provides the longest bottom times and safer profiles. Regardless of what your dive computer says, we recommend leaving a margin of safety by surfacing even before the NDL it displays. As useful as they are, we believe that you should not blindly adhere to the limits indicated by this device.
Dealing with the physiological effects of deep diving
Since wall diving is often synonymous with deep diving, divers are at risk of experiencing nitrogen narcosis, which is a physiological condition when the nervous system is exposed to higher nitrogen pressure, resulting in a state that is not dissimilar to being drunk while diving.
Nitrogen narcosis is not deadly by itself, however what makes it deadly is that divers are rarely aware that they are impaired, and they are at greater risk of making more dangerous decisions because of their reduced inhibitions. For instance, while under its effects, divers have been observed to ignore their decompression limits or forget that they need to surface soon.
Typically, nitrogen narcosis begins to take effect at depths of around 30 m (100 ft), however some divers can get affected even sooner. Symptoms include lightheadedness, mental confusion, euphoria, or a general tipsy feeling. These symptoms are not long-lasting and will subside immediately once a shallower depth is reached.
Unfortunately, there isn’t much you can do to combat nitrogen narcosis unless you’re willing and able to dive trimix. To decrease its effects, make sure you have not consumed any alcohol at least 24 hours prior to diving, and are well-hydrated before the dive.
Since wall diving requires you to dive quite deep, you’ll also be at increased risk of decompression sickness. You must ascend slowly and be comfortable with making safety stops. Remember to vent air from your BCD early and often, for the same rationale as when you’re descending to depth.
Even if you are doing a no-decompression dive, we highly recommend performing multiple safety stops on the ascent to give your body ample time to off-gas. Here’s an example of what we mean. You should make a 1-3 minute safety stop at 9 m (30 ft), then ascend to 6 m (20 ft) and remain there for another 1-3 minutes. Make one final stop at 5 m (15 feet). The final 15-20 ft are the most critical because divers are typically so anxious to surface that they rocket to the top. Doing so will drastically increase your chances of getting the bends, and doing what we described will drastically reduce your chances of getting it.
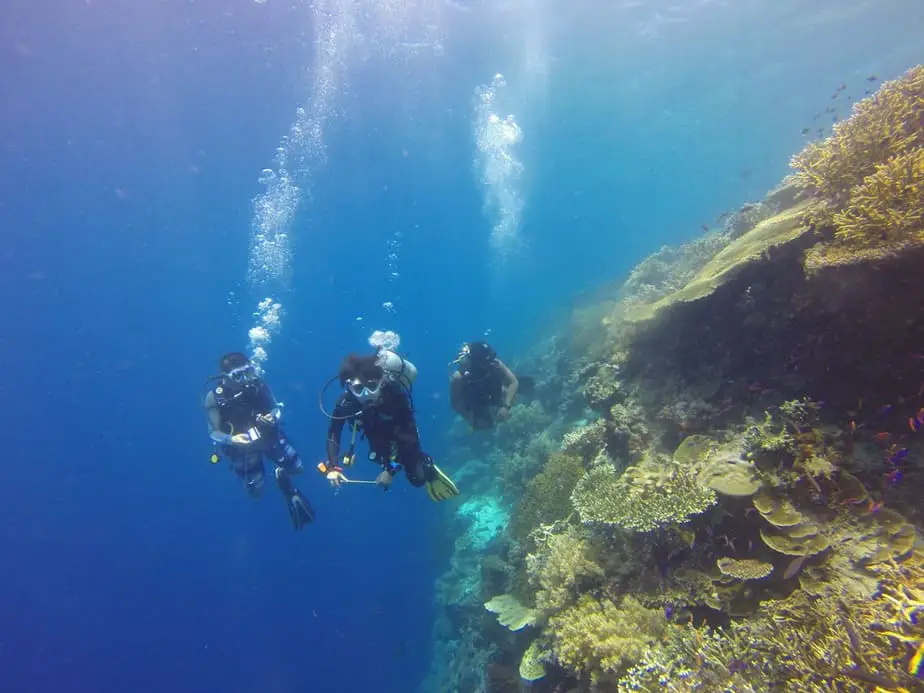
Dive with a buddy
Since wall diving is done at deep depths, there is a clear need for underwater communication and the buddy system. Once you have passed the depth where you can no longer perform an emergency swimming ascent, your dive buddy or dive group becomes your life line in an out-of-air situation. To become less dependent on them, you may want to bring a second scuba cylinder and dive sidemount or in a twinset.
Smart divers will dive their plan, stick closely with their dive buddy, and agree on a communications plan prior to entering the water. We stress the importance of having a dive plan. Since most wall dives are deep dives, the no-decompression limit is quickly reached. Therefore, it’s highly likely you’ll need to do a decompression dive. Figure out what your maximum depth and bottom time should be and follow it to a T.
Upwelling and downwelling currents
Walls may sometimes be surrounded by fast-moving downwelling and upwelling currents. The vertical facade of a wall is sometimes surrounded by intense currents that either rush over the lip and flow downward, or they originate from the seaward side and push up with great force. Getting caught in the middle of upwelling and downwelling currents puts a diver at risk of being pushed deeper than intended, or forced upward rapidly without any time to decompress.
The best way to deal with these currents is to stay out of their way. Should you find yourself caught up in an upwelling current, immediately deflate your BCD to stymie your ascent and swim laterally out of the flow. To escape a downwelling current, inflate your BCD to offset the downward force and swim laterally along the wall or closer to it to reduce the impact of the current.
Stick close to the wall
We touched on this a bit in the previous point, but a general rule of thumb is to stay close to the wall. You’ll probably naturally be doing that anyways, because it can be a bit scary floating way out in the open ocean. However, there is a practical benefit to doing this as well, which is that there will be less current to deal with compared to the open blue water. When you’re close to the wall, be careful not to kick it and hurt yourself as well as damage your fins.
Wall diving equipment
Unlike some other types of diving, wall diving does not require anything more than the basic scuba kit. Specifically, that means the usual: scuba tank, regulator with octopus, pressure and depth gauges, a dive watch, buoyancy control device, weight system, fins, mask, snorkel, and exposure protection.
While a dive computer duplicates some of the information provided by your gauges and dive watch, it also provides highly valuable real-time no-decompression data. The calculations performed by the computer while you’re diving will be more accurate than any dive table data you calculated on the surface. Furthermore, you can effectively and safely take advantage of the multilevel profile opportunities that wall diving affords you. Your gauges and dive watch will serve as backups in case something goes wrong with the dive computer.
You may also wish to bring a dive slate so that you can more easily communicate with your buddy. You can also use it to record your planned and alternate profile, maximum bottom time and depth, and maximum bottom time for the next deeper table depth in case you overshoot your planned depth and are not equipped with a dive computer to calculate your new situation.
In order to see into the myriad crevices and cracks on the walls, you’ll need a reliable dive light. As we mentioned, it’s greatly beneficial to bring a mini-tank or even a second scuba cylinder so that you have an alternate air source in case of an emergency.
A great safety accessory when wall diving is a surface signaling device such as a surface marker buoy. Typically, when drift diving by the wall, the boat will follow the bubbles that have reached the surface and wait next to them to pick divers up. However, when there are many divers to keep track of, each surfacing at different times and places, as well as choppy surface conditions can make it difficult for the boat crew to track your whereabouts.
As a result, you may surface and find yourself far away from the boat, or the crew may not be looking in your direction. To get their attention, you may use a whistle or some kind of reflective surface signaling device to communicate your location without needing to shout at the top of your lungs.
All of your equipment should be safely secured with a lanyard or some kind of fail-safe fastener so they don’t sink into the depths if dropped. Due to how far away the ocean floor is at some wall dive sites, dropping an item is tantamount to losing it because it’s not a good idea to exceed your planned depth and you may not be able to retrieve it in time anyways.
During your final safety stop, you may be close enough to the boat to encounter a hang tank (tank and regulator) or a hookah line (second stage regulator) attached to the end of a long hose that connects to the scuba tank on board the boat. Not all boats have this, but it’s a nice safety precaution. In the event of a low-air situation, divers will feel anxious about performing a safety stop.
With an alternate air source provided by the boat, divers can safely complete their safety stop before surfacing. The valve on the hang tank may need to be opened yourself, so don’t be surprised if there’s no air initially. In the case of a hookah line, the air should already be turned on so all you need to do is pick up the regulator, purge it, and inhale. If a hookah line or hang tank is offered, the boat crew will explain how to use theirs during the pre-dive briefing.
How to start wall diving
If you’re worried about how to start wall diving, know that it is within the capabilities and reach of any certified diver who is willing to put in the effort. The sport of scuba diving has many facets that provide interesting new experiences for you to enjoy. With wall diving, no two walls are the same and there are many locations that you can wall dive worldwide.
Diving the wall provides a sensation like no other. Most wall diving environments consist of a living skyscraper covered in coral, sponges, and marine life on one side, an endless blue expanse on the other, and a bottomless abyss underneath. Shafts of sunlight penetrate the water from the surface above, but walls can start at depths where the light has become dim.
Depending on where you dive, the beauty and majesty of a wall can feel awe-inspiring. To start your wall diving journey, a good place to start is with a local dive instructor. They will give you all the tips on how to safely navigate the wall dive site you’re planning to dive. They can also provide you some wall diving specific tips like the ones we provided in the tips section of this article.
To remove all the limits holding you back from freely wall diving, you may need additional certifications. Certainly a deep diver certification is necessary since most walls are found at depths past 18 m (60 ft). You might also want to consider learning about diving nitrox and trimix which can increase your bottom times and limit nitrogen levels that accumulate in your bloodstream.
If you currently only have the basic Open Water Diver certification, you may still be able to enjoy some shallow wall dives. Many divers choose to get their deep diving certification while on vacation, often at dive resorts that offer on-site instruction at wall diving locations. If you can plan this out carefully, you can hit two birds with one stone to maximize your vacation dollars and training dollars.
No matter how you choose to start wall diving, it’s important that you have the proper training and the certifications to prove it. Lastly, always dive with a buddy and be especially wary of your depth gauge and buoyancy control while wall diving. With these tips in mind, go and enjoy what wall diving has to offer.