Best Freediving Fins for Beginners

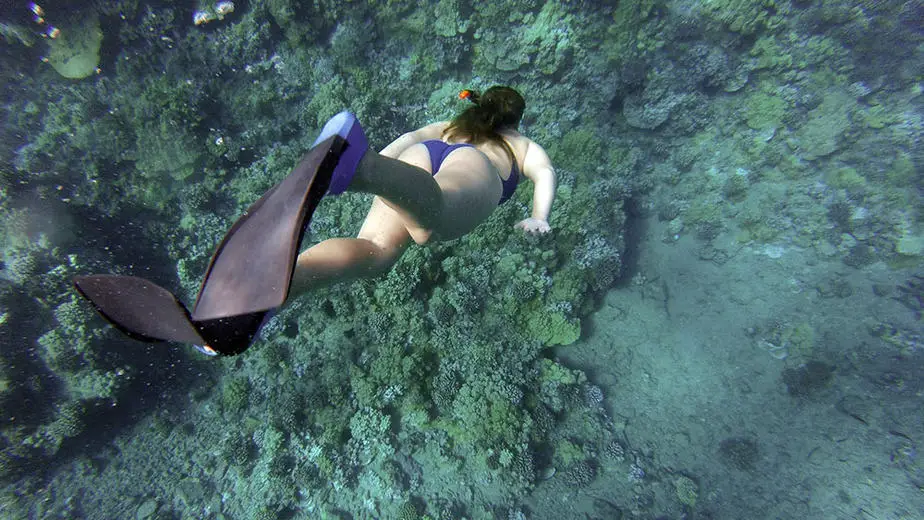
You need to have a reliable pair of freediving fins in order to travel farther and faster underwater. There is a big difference between the freediving fins that pros use and what beginners use. The best freediving fins for beginners should be affordable with soft fin blades so that it is easier to ease into.

Even with an entry level freediving fin, you will be shocked at how easy it is to surpass your previous depth records. It will almost feel like you’re cheating compared to diving without fins or with the wrong type of fins

However, in order to achieve results like this, there are a few factors to consider when shopping for beginner freediving fins. In this article, we will go over everything you need to know about the best freediving fins. You will learn about the top brands, materials, design style, how to take care of them and safely bring them when traveling.

Our Top Picks:

Cressi Gara Professional LD [44/45]
Leaderfins FINSWIMMER Monofin for finswimming, Dynamic apnea and CWT Freediving (XXL / EU 45-46 / US...

What to Look for In the Best Freediving Fins

What features should you look out for in a pair of freediving fins? To start, there are two features that are absolutely essential, and they are 1) closed heel foot pockets and 2) long and soft blades. Of course, these aren’t the only factors you should consider, but they are the most important. Let’s go over why.

Closed Heel Foot Pocket

If you are serious about freediving, you shouldn’t even consider using open heel fins; your only option is closed heel (full-foot) fins. For those unaware, the closed heel foot pocket design on a fin means that the foot pocket completely wraps around your feet, similar to wearing a shoe. This design allows for superior power transfer resulting in greater finning speeds.

On the other hand, the open heel foot pocket design leaves a space by your heel. Much of your foot is left uncovered by material, and the fin is held in place by a small adjustable strap that wraps around your ankle.

Wearing fins with open heel foot pockets feels similar to wearing sandals. You even need to wear water socks or dive booties to keep the strap from digging into your leg. This style tends to result in inefficient power transfer resulting in lower finning speeds.

Alright, now you know a bit about these two fin styles, so what makes closed heel fins better for freediving? Once again, when the rubber material completely wraps around your feet, you get a secure, tight fit. This stable fit gives you greater power transfer per kick, which is important when freediving because you can fin faster with less effort, thus saving you precious oxygen.

In a sport like freediving where each second counts, you need to make every single optimization you can and closed heels are strongly recommended. Going forward, assume each fin we will be discussing is a closed heel fin.

If you just prefer open-heel fins, then we recommend you pair them up with a pair of dive booties. Without dive booties, your feet will be left exposed to the cold water and unprotected from the strap which can dig into you and cause discomfort.

Similarly, closed heel fins can also chafe your skin, so we recommend you wear them with a pair of neoprene water socks for added protection.

Long Blades

best freediving fins with long blades

The second important factor to look for when shopping for freediving fins for beginners are long fin blades. Do NOT get short fin blades.

Freediving fins with long blades displace more watch with each kick, resulting in greater kicking efficiency. In other words, when you kick with long-bladed fins, you will travel longer distances at faster speeds all while exerting less effort and conserving precious oxygen.

With short fins, you will be rapidly kicking and feel like you’re barely moving. It’s like trying to pedal a bike on first gear; you’re spinning your wheels and burning through your energy and oxygen reserves and not getting anywhere. Meanwhile your competitors zoom past you in fifth gear and can stay underwater for longer.

Again, if you are serious about being a competitive freediver and realizing your full potential, you should get freediving fins with long blades.

Now that we’ve covered the two most important factors when selecting beginner’s freediving fins, next we’ll cover some additional considerations that you can keep in mind as well.

Soft Blades

If you’re a freediving novice, you’ll want to keep an eye out for fins with soft blades. These will let you get used to them and develop your leg muscles as well as finning technique during shallow dives.

More often than not, beginners will purchase a super expensive, ridiculously long and durable carbon fiber fin – because that’s what the pros wear – only to find that they can’t handle the physical strain that it puts on their body. They end up disappointed that their legs get cramping up, they were out of breath the whole time, and they couldn’t get the performance they expected.

Learn the proper technique and build up your fitness level with soft blades

Even if you are very physically active, you should probably still practice with soft blade fins. Why? You want to learn the perfect technique as a beginner, because it’s hard to break out of a bad habit later on. It’s very easy to develop poor finning habits if you start out with stiff blades.

In a sport, athletic ability is certainly important, but technique is just as important. A good athlete will excel not only in terms of raw power but also due to skillful movement. Learning any new activity requires repetitive and diligent training so that you can perfect the motions needed to perform the task.

The reason that stiff fins are not recommended is that due to their inflexibility, an inexperienced diver will bend their legs by the knee to instinctively compensate for the strong resistance. This is a mistake. Your legs should remain relatively straight, which can feel awkward if you’re not used to finning.

Furthermore, regardless of one’s fitness level, there is a tendency for beginners to develop an imbalanced stroke where they kick back harder since moving the fins is easier in that direction. Having to undo these bad habits later on can be a nightmare, but starting out with soft blades will keep you from developing most of them.

Conserve Energy Along the Surface

As a novice, much of your freediving activity will take place near the surface of the water, where you can easily tire yourself out from the difficulty. You don’t want to exhaust yourself before you’ve even had a chance to practice deeper dives. Only when you have become proficient at finning and have improved your overall fitness level should you consider upgrading to a stiffer fin.

Best Freediving Fins for Beginners Review

Cressi Gara Professional LD

Cressi Gara Professional LD [44/45]
  • Sport Type: Outdoor Lifestyle

Without a doubt, the best freediving fins for beginners is the Gara Professional LD by Cressi.

Affordable: To start, they are high-quality and affordable, making them the ideal candidate for a low-risk, entry-level investment for beginners looking to get into the sport. You can expect the average high-end freediving fin to be at around $300. As an advanced freediver, this is a fair price to pay.

However, as a beginner that is a huge sum of money to spend on something that you aren’t even sure about. Your goal should be to find a solid pair of long freediving fins that are good enough to get you started with technique training and building your endurance. Once you’ve perfected that, then you can consider investing in high-end equipment (more on “high-end” equipment later).

Blade Material: The Gara Professional LD comes with elastomer polypropylene blades which are durable and economical. However, these blades have a downside which is that they can feel uncomfortably stiff starting out. It may take a few training sessions for you to get comfortable with its stiffness and the effort needed to kick with them.

You won’t be used to finning with long blades starting out. There’s no way to get around it other than to train until you develop strong, powerful legs through diligent training with long fins. Thankfully, the Gara Professional LD fin blades are made from an elastomer-polypropylene blend which makes the blades softer and more pliable.

What this means is that you can get the same power of stiffer fins with less effort. Once you put these fins on, you will soon be slicing through the water at incredible speeds while spending less energy and conserving oxygen levels. It’s not cheating, it’s being smart.

Full-Foot Fin Pockets: We said it before, but closed-heel fins are the ideal design for a freediving fin. The Gara Professional LD will wrap around your feet in such a way that the blade will be angled at a higher insertion point above your feet.

This will help you perform highly efficient kicks with great thrust that propels you through the water until you reach your desired depth.

With the Gara Professional LD, you get performance that almost rivals high-end freediving fins from a trusted, reputable brand in the water sports market. You should also pick up a pair of 2-3mm neoprene socks to prevent chafing, provide insulation, and achieve a snug fit.

Best Bi-Fins for Advanced Freedivers

Once you’ve got some freediving experience under your belt, you might start to feel like you’ve “outgrown” your plastic/elastomer fins. It is common to experience this feeling after one to two years and that means it is time to upgrade your fins to something more sophisticated.

Generally, the average freediver will follow this upgrade path:

  1. Start with Plastic Elastomer Fins and use for one to two years.
  2. Upgrade to Fiberglass fins and use for one year.
  3. Upgrade to Carbon Fiber and use it for 5+ years.

You can even skip step 2 and just go from plastic freediving fins to carbon fiber for both practical reasons and economical ones.

The upfront cost is more because carbon fiber is $100 more expensive than fiberglass, however you are paying for the best. However, in the long run it is cheaper if you invest upfront since you don’t have to buy an extra pair of fins only to upgrade it a year later.

Additionally, with carbon fiber fins you can get instant gratification once you experience the speed boost that only the freediving fin made with the best materials on the market can provide.

Leaderfins Pure Carbon Fiber

Leaderfins Pure Carbon Fiber Freediving and Spearfishing Fins (EU 33-34 / US 3-4, Hard Stiffness)
  • The blade is made from a high quality mixture of epoxy resin and carbon fibre.
  • Angle 20 degrees
  • Foot pockets are very different from regular shoes and hence we strongly recommend you to follow the guide in the last picture of the listing in order...

A good starter carbon fiber fin is the Leaderfins Pure Carbon Fiber. This fin features stiff foot pockets for additional thrust, with a soft fin blade that is simultaneously easy on your legs while packing a powerful kick. Seriously, this fin is unbelievably easy to fin with (you don’t need legs the size of tree trunks to use it).

For its price, you are getting an incredible deal when compared to the cost of other carbon fiber fins. Once you’ve had a chance to try out the Leaderfins Pure Carbon Fiber fins, you will be blown away by how far one kick will propel you; it almost feels like you’ve got boat propellers instead of fins.

C4 Martin Stepanek

C4 Martin Stepanek Signature Carbon Freediving Fins 40 Stiffness (45/46)
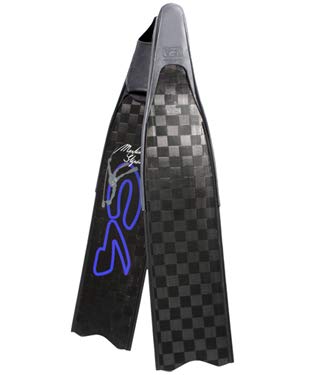
  • NEW Industry unique TR50 Carbon fiber construction
  • 22 Degree Angle
  • Comes with OMER foot pocket

Since you’re already spending a pretty penny, you might want to consider investing in the best overall carbon fiber freediving bi-fins, and that is the C4 Martin Stepanek freediving fins. You can select from three fin stiffnesses so that you can choose the optimal fin that is both comfortable and offers great performance in the water.

What makes the Martins stand out is how light they are. Swimmers and freedivers need swimsuits that are form-fitting to reduce drag. The next optimization to make is to wear incredibly light fins so that freedivers can slice through the water to outperform the competition. Your gear should help you perform better, not hinder you!

Since the C4 Martin Stepanek is light as a feather, you can be fast and agile in the water, allowing you to swim like you’re part fish.

Traveling with Long Freediving Fins

No matter how you plan on traveling – by plane, boat, or car, you need a durable and robust bag that is large enough to carry all of your freediving gear. Unfortunately, due to the length of freediving fins, they won’t fit in any diving bags.

Most diving bags measure in at 35 inches in length. Most freediving fins are longer than that by about 3-4 inches. In other words, good luck trying to pack your fins in that. And no, bending the fin blades is not an option!

It’s not a bad idea to invest in a dedicated bag for your freediving fins. However, you could also invest in the Palantic Fins bag (B00BQ1DUE0), currently one of the top fin bags on the market. At 40 inches long, this bag can just barely hold most long freediving fins.

We strongly believe that you should invest in a dedicated freediving fins bag. Particularly if you have invested in a pair of carbon fiber fins, you should not be exposing your expensive fins to scratches and dents. They must be kept in a bag, otherwise your fins will suffer wear and tear at an extremely fast rate.

Particularly if you are traveling by plane, your fins must be kept in a bag. We even recommend you bring it with you as carry-on. Relatively speaking, the cost of a fin bag is very low compared to what you’d have to pay to replace your trusty pair of fins.

If possible, try to bring your fins with you as carry-on. In my experience, airline staff don’t mind but they may be curious about your fins. In any event, whether you check your luggage in or bring it with you, your fins ought to be kept in a bag.

Freediving with a Monofin

monofin and bi-fins emma farell
Left: Monofin. Right: Bi-Fins. Photo Credit: Emma Farell CC By 2.0

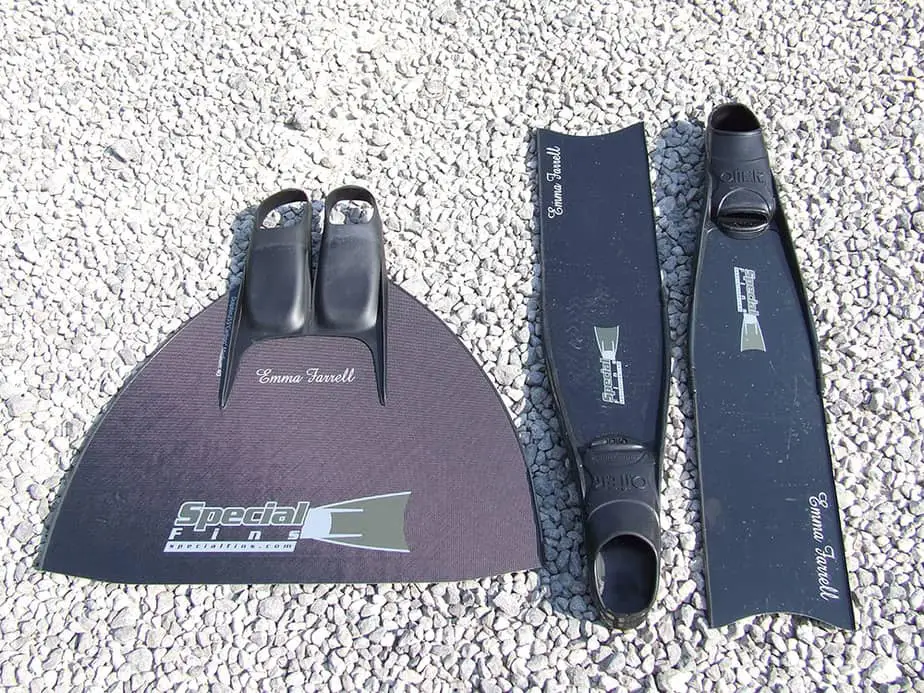
As a beginner, you don’t need to concern yourself with this. However, if performance is what you’re looking for, then one day you may end up using a monofin. They are the most efficient and effective type of freediving fin you can get.

When you use a monofin with good dolphin kicking technique, you will achieve speeds that surpass bi-fins. Monofins are different from bi-fins in that there is only one fin blade instead of two. That singular large blade is similar to the flipper found on dolphins. Both foot pockets are located next to each other and connected to the same fin.

Since you cannot separate your feet, turning in the water becomes a nightmare, and both feet must move at the same time in order to kick. Despite this, monofins provide the best performance, allowing freedivers to achieve speeds 10% to 40% faster than bi-fins.

When it comes to efficiency, speed, and depth moving in straight lines then the monofin is the best option for you. Since monofins are so different from other fins, it will feel very awkward using them in the beginning.

With that said, we do not recommend investing in a monofin if you plan on doing any water activities other than competitive freediving. They are not ideal for cave diving, underwater photography, spearfishing, or casual diving.

Monofins are designed and intended for competitive freedivers that are trying to set new world records and surpass other freedivers. They are not made for the casual freediver; they are built for unmatched speed. For the vast majority of freedivers, the bi-fins mentioned above will be sufficient for almost all cases.

If you are still interested in getting a monofin, then check out the Leaderfin Monofin. Measuring in at a whopping 28” x 28”, the large blades will displace large amounts of water with each kick. The blade is flexible and will snap back to their original position after each kick (this is the secret behind the monofin’s exceptional performance).

Leaderfins FINSWIMMER Monofin for finswimming, Dynamic apnea and CWT Freediving (XXL / EU 45-46 / US...
4 Reviews
Leaderfins FINSWIMMER Monofin for finswimming, Dynamic apnea and CWT Freediving (XXL / EU 45-46 / US...
  • The blade is made from a high quality multilayered fiberglass
  • Supplied with free neoprene socks
  • Foot pockets are very different from regular shoes and hence we strongly recommend you to follow the guide in the last picture of the listing in order...

Freediving Fin Buying Guide for Beginners

Design

If you’re just starting out, then the best freediving fins for beginners are ones with fixed blades. They are cheap, easy-to-use, and very durable. There’s no need for any complicated assembly or maintenance, just slip them on and dive in. The downside of fixed blades is that as you improve as a freediver, if you want to make an upgrade then you have to purchase a new pair of fins.

On the other hand, there are modular freediving fins which give you the option to upgrade the blades as you see fit. Beginner modular fins come with plastic blades, and you can upgrade to carbon fiber of fiberglass blades in the future for better performance. The downside of modular fins are their high price compared to fixed blade fins. Also, they are not as durable so you will have to take extra care to keep them safe.

Durability

As mentioned above, entry-level freediving fins with fixed plastic blades are more durable than carbon fiber or fiberglass blades. Sometimes the stiffness and durability of fixed blades is taken advantage of by spear fishermen and advanced freedivers who prefer the lower sensitivity.

Some divers also prefer to use their inexpensive, basic plastic blade fins for diving in rocky or rough areas where the risk of damaging their high-end blades is higher. If you have a spare pair of fins, then use them whenever you aren’t boat diving or training to keep the risk of damage lower.

You must be careful to avoid damage even when traveling. That is why you should buy a dedicated fin bag to store your fragile modular fins when not in use.

best bi-fins for freediving

Stiffness

If you opt for fixed plastic blades on your beginner freediving fins, check that the stiffness is something that your body can handle. You can do this by searching the fin manufacturer’s website or product description about its hardness.

For the most part, as a beginner or someone who simply wants to do long distance swimming by the surface, it is recommended to choose blades that are soft or have a medium stiffness rating at the most. Stiff, rigid blades are difficult to swim with.

To properly use stiff blades, one needs to have powerful leg muscles and a large body type to have the power to continuously propel their body through the water using stiffer blades.

Price

When starting out, you should look for affordable freediving fins. While learning the ropes on how to properly freedive, it is really common to damage the blades due to rocks or improperly storing them when traveling. There’s no need to get the best of the best for your first pair of fins.

Even after you’ve got some experience with freediving and are looking to upgrade to the next pair of fins, don’t just look at the price. We’ve listed many other considerations in this guide, and if a pair of fins fulfills your needs and can help you reach your freediving goals, then get that pair.

Sizing

Sizing is always an issue when you shop online and can’t try it on in-person. For something as important as freediving fins where a snug fit is necessary, correct sizing is crucial. Here is where most people go wrong.

The majority of freediving fins are made by European manufacturers, so the best point of comparison is to take European size convention into account when buying a pair. Unfortunately, this is not foolproof because the conversion from US to European sizing can vary across retailers.

The best way to solve this issue is to manually measure your foot yourself, instead of relying on your regular size and converting it to European standards. Also read the customer reviews to see what other people have found out regarding sizing for a particular fin.

Barefoot or with Water Socks?

When you are shopping for a freediving fin, you have to consider if you will be wearing neoprene water socks or wearing the fins barefoot. Most fins are sized such that a correctly sized pair fits a little loose barefoot. The expectation is that you will be wearing a 2-3mm water sock in order to achieve a snug fit.

Even if you only plan on swimming in tropical waters, you should probably still wear neoprene socks for the extra insulation. The deeper you dive, the colder the water gets even in a warm climate, so extra insulation to keep your feet comfortable and warm is nice. It can also help you conserve energy, since cold feet don’t work as well.

Length

Travelling with a full-length pair of freediving fins can be a hassle, and we recommend you purchase a dedicated bag for them. The bag should also have extra space to accommodate your snorkel and mask, and perhaps a wetsuit as well.

Since these bags are long, you might be tempted to check it in. However, we feel it is safer to bring with you as a carry-on luggage when flying. These items are fragile, and you don’t want inconsiderate airline staff to pile a bunch of heavy baggage on top of it and damage it.

Freediving Fin Care

The materials that freediving fins for beginners are made from are durable when used in the proper context. They should be able to withstand wear and tear, however their long length does make them more fragile than standard snorkeling or SCUBA fins. This is especially true if you bought yourself a pair of modular fins.

It is better to err on the side of caution and treat them like they are fragile. This will put you into the right state of mind for when you decide to upgrade to the more expensive and delicate carbon fiber or fiberglass fins.

When you’re not wearing them, always store your fins in the dedicated bag. After each freediving session, thoroughly rinse them and dry them in a well-ventilated place away from direct sunlight.

When putting them on and taking them off, try to do so exclusively in the water so that you don’t have to walk very much in them. Not only is it very easy to trip over the fin blades, but you can easily damage them. Just treat them like they are special equipment (because, well, they are) and you should be able to keep them safe.

Best Freediving Fins for Beginners Recap

When shopping for a pair of freediving fins for beginners, the two most important factors are a closed heel foot pocket design, and long, soft fin blades. Fins with a full-foot design will wrap tightly around your feet for the most secure fit.

Long blades are important because they will generate more thrust with each kick. The fin blade should also be relatively soft for beginners otherwise they will be too hard to practice with. When starting out with freediving, one must quickly build up their leg muscles to be capable of kicking with long fins.

Furthermore, one must learn the proper finning technique when diving in order to be more efficient underwater. Entry level fins are typically made from plastic, and higher end ones are made with carbon fiber or fiberglass. Beginner freedivers should start with long plastic fins and use those for a year to learn the technique and get used to the fins.

Afterwards, one can decide to upgrade to modular carbon fiber or fiberglass fins. These materials are lightweight and help slice through the water with each kick. Once you have expensive fins like these, you must strive to take good care of them.

You should invest in a dedicated fin bag for your freediving fins. Since most freediving fins are around ~38.5” in length, your bag should be even longer than that. Without a bag to store your fins, they can easily get scratched, especially when traveling. When traveling by plane, try to bring your fin bag as a carry-on if possible.

Try to put on and take off your freediving fins only in the water. This will limit how much you need to walk with them. Since freediving fins are so long, it is easy to trip over them or damage them when walking.

Once you’ve got yourself a solid pair of freediving fins for beginners, you will be able to jet through the water to depths you’ve never reached before. Furthermore, by taking proper care of them you will be able to use them for years to come.

You may also be interested in our other gear reviews:

  • Click here to read our freediving weight belt review.
  • Click here to read our freediving watch review.
  • Click here to read our dive buoy and line review.

Best Swimsuits for Snorkeling

The best swimsuits for snorkeling should not only look and feel good, but also provide a satisfactory amount of sun protection and coverage. Your swimsuit should stay secure on your body as you’re moving around and provide physical protection from jellyfish stings.

Don’t be fooled by how the media portrays beachgoers; not every woman is wearing a bikini and not every male is shirtless with the body of a Greek god. If you can roll that way, more power to you, but know that when it comes to swimwear there are many options available.

As a general rule of thumb, it is a good idea to cover any exposed skin, especially if you plan on snorkeling all day. Otherwise you will have to take frequent breaks to reapply sunscreen which really ruins the flow. Furthermore, by wearing a rashguard or swim leggings, the additional coverage can protect you from stings or scratches as well as the sun’s UV rays.

In this article, we’ll go over the types of swimwear that are available, as well as the factors you should consider when searching for the best swimsuits for snorkeling.

Types of Swimwear

One-Piece Women’s Suits

In terms of style and function, modern swimsuits have come a long way compared to the past. Since most one-pieces tend to stay secure on the body better than two-piece suits, they are an optimal choice if you plan on doing rigorous water activities like SUP boarding, diving, bodysurfing, snorkeling, etc. If performance is important, look for tight-fitting, cross-back streamlined suits designed for minimal drag in the water.

Two-Piece Women’s Suits

It’s easy to customize two-piece suits for your body type and preferred water sport since top and bottoms are sold separately. When shopping for two-piece suits, make sure to buy products from active brands that are designed to stay in place and for performance. One advantage of two-piece suits is how convenient they are for bathroom breaks compared to one-piece suits.

Tops on two-piece suits have various styles, however they can be lumped together into two main categories:

Bikini: These include the bra or bralette-style top and the classic triangle top.

Tankini: Tank tops for swimming that generally cover the midriff.

Swim bottoms have a wide range of coverage, from the usual bikini bottoms to ones with higher leg cuts and more coverage. Additional options include boy short styles or swim skirts.

Men’s Swim Trunks

For a more casual and laid-back look, you can’t go wrong with swim trunks. They provide decent coverage ranging from short to about knee length, and usually come with elastic waistbands, snaps, or drawstrings. For additional support, swim shorts may come with an inner mesh brief. For added variety, swim trunks can be baggy or tailored.

Men’s Swim Briefs

If you need to perform at your best, then these form-fitting, brief-shaped bottoms are essential if you want your free range of motion and speed to be unencumbered. Swim briefs are great for rigorous water sport activities such as water polo and swimming where drag must be belt to a minimum.

Swim Leggings

For maximum sun protection on your lower body, you can wear swim tights, also called long swim bottoms. When you are surfing, paddleboarding, snorkeling, or doing any sport activity where you will be exposed to the sun for several hours, it’s really annoying to reapply sunscreen when you can just cover up your body with UPF fabric. Depending on the material, it can even provide some insulation in chilly waters.

Board Shorts

Board shorts have a lot of variance in their coverage. For example, women’s board shorts tend to be more revealing, often with a 2-inch inseam. On the other hand, men’s board shorts are around knee length and this extra length protects thighs from chafing against paddle boards and surfboards. Of course, women can wear men’s board shorts as well as long as the waist measurements match.

Jammers

Jammers are form-fitting shorts that hug the thighs and bottom. Think of them like bike shorts minus the padding. Like all snug-fitting swimwear, they are ideal for swimming since they have less drag than other swimwear.

Rashguards

Rashguards come in many styles – long sleeve, ¾ sleeve, short sleeve, cap-sleeve, loose-fitting or form-fitting, zip-top or pull-over. As the name suggests, they are shirts that protect you from rashes and chafing during those long hours you will spend surfing, paddling, swimming, or snorkeling.

They’re stretchy, lightweight, and incredibly comfortable. With a long-sleeve UPF rashguard, most of your upper body is covered and protected from the sun’s UV rays. They also offer some protection against jellyfish stings.

What Makes An Ideal Swimsuit?

Sun Protection

Clothing should not only be worn as a fashion statement; they also have a very practical benefit of providing you some protection from the elements. Swimwear is clothing you wear in the water, so you should hold it to the same standard. The ideal swimsuit should also be comfortable and made from quick-drying fabrics.

Did you know that one of the most underestimated threats to your well-being while snorkeling is the sun? When you’re spending all day floating along the water’s surface with half of your body completely exposed to the sun, you are allowing harmful UV rays to damage your skin. Even if you’ve applied sunscreen, it’s very easy to lose track of time and forget to reapply it, or to have areas where the sunscreen wasn’t applied evenly.

Thankfully, swimsuits can offer sun protection that is superior to sunscreen in terms of blocking UV rays. You can get swimwear with a UPF rating of 50 which will absorb over 98% of both UVA and UVB rays, whereas some sunscreens only block UVB rays. Additionally, with UPF swimwear you don’t have to apply any sunscreen as long you’re completely covered up.

Furthermore, not all sunscreen is biodegradable or reef-safe. Sunscreen often contains ingredients that are harmful to coral reefs and contribute to their deterioration.  In some cases, even sunscreen marketed as reef-safe still has a negative effect. In other words, since alternative forms of sun protection exists in the form of swimwear, the less sunscreen you use the better.

Form-Fitting and Secure

You can get swimwear that not only looks good, but has many other practical benefits. Just make sure to stay away from Bikini Village and check out a sports store instead. You’re looking for swimwear that won’t get undone as soon as a wave splashes on you.

Stay away from flimsy spaghetti straps and head toward tank tops or tops that are similar to sports bras. For bottoms, look for boy shorts of briefs with thick waist bands or robust drawstrings to ensure it stays on you. Look out for these features, but you can also consider a form-fitting one-piece swimsuit as well.

Factors to Consider when Selecting a Swimsuit for Snorkeling

snorkeling with fins

Select swimwear based on your intended use. Consider the way you move in the water and how much you are exposed to the sun to help narrow down your choices. If you are frequently on the move and ducking waves, for instance, then you want to make sure your swimsuit stays secure. Look for a rashguard, a one-piece suit, or a top with thick crisscross straps or racerback to ensure it stays on.

Determine how much coverage you want. We understand that not everyone wants to completely cover their body for total UV protection. Perhaps you plan on doing a little bit of sunbathing as well. You can wear a more revealing swimsuit to start, then layer up by wearing a rashguard and board shorts once you’ve soaked up enough sun.

Decide on the fabric and features you like. If you want to carry important items with you, then zipped board-short pockets are a godsend. Quick-drying fabrics helps you transition from water activities to land activities in a breeze.

Find something comfortable. All of these factors above won’t mean anything if it’s so uncomfortable you’re just dying to take it off. If the swimsuit is doing its job, you won’t even remember it’s there. Your time ought to be spent focusing on snorkeling, not adjusting your bottom because it keeps riding up.

What to Look for in a Swimsuit for Snorkeling

Quick-drying fabric 

If you plan on spending time out of the water in your swimsuit, then consider wearing swimwear made from fast-drying fabric. An additional benefit is that it can reduce chafing by wicking away the moisture on your skin. Keep in mind that suits with cotton blends or thicker fabrics will take longer to dry.

UPF Rating/UV Protection

If you notice the swimsuit has an ultraviolet protection factor (UPF) between 15 to 50+, that means it is made using sun-protective fabric that blocks over 90% of the sun’s harmful UV rays and will keep you from getting sunburnt.

The higher the UPF, the greater the protection, though there is not that much difference between UPF 15 and 50 (94% UV radiation blocked vs. 98%). Sun protection clothing will block both UVA and UVB rays, whereas most sunscreen only blocks UVB rays unless it is stated to be broad spectrum.

Inner Liners

Men’s trunks may come with inner mesh brief or other such lining to reduce chafing and increase coverage. Women’s suits may include liners for similar reasons, as well as for greater opacity when wet. Some include special linings that keeps the suit clinging firmly to your body even in turbulent waters.

duck diving tips

Removable Bra Cups

Some women like the increased coverage and larger bust size they get with padded bra cups, but if this isn’t your thing you can just as easily remove them.

Pockets

If you want to keep your lip balm, car keys, or other small essentials close by while snorkeling then you can do so by wearing swim shorts with zippered pockets or inside mesh pockets.

Swimsuit Strap Styles

The straps on women’s swimwear are not just there for looks. Their function during active sports is crucial for comfort and support. When selecting a swimsuit, look for ones with wider straps because narrower ones tend to dig into your skin and feel uncomfortable.

Furthermore, adjustable straps allow you to tighten or loosen them to accommodate your specific body shape and are useful for dealing with straps that have loosened over time. Next, bathing suit tops that have back closures can make it easier to don and take off, particularly when it is wet.

Suits that have racerback/crisscross strap styles are excellent for arm and shoulder range of motion while keeping a tight fit. Lastly, halters have straps that wrap around your neck and provide additional support for women with larger busts (though the straps can sometimes dig into the neck and cause discomfort).

Swimsuit Fit

If you prefer to do your swimsuit shopping online, expect some trial and error. The best way to get one that fits you perfectly is to try it on in person and move around to determine where it sags or is too constrictive.

How should it fit?

For more fitted styles, the goal is to strike a balance between nice and snug without feeling too tight. Here are some ways to determine proper fit. If your suit tends to ride up or the waistband or straps are causing you discomfort, consider going up a size. If the straps keep falling off, the fabric sags, or the waistband isn’t keeping your trunks in place, then size down.

Bra Support and Fit

Some swimsuit bras include removable soft cups to provide additional shape and modesty. A few suits have underwire or built-in shelf bras to support bigger busts (ensure that the underwire doesn’t pinch anywhere and is laying flat).

Tips for Selecting a Swimsuit for Snorkeling

Should you wear bikini briefs or boy shorts? One-piece or two? How much coverage do you want? The answer to these questions is highly personal, and it depends on how you intend to use it and what you want out of your suit.

Additional Top Support

If you want more support up top, then look for tops with higher necklines, one-piece suits with adjustable straps in the back and a halter, or suits with wider shoulder straps for additional bust support.

Some other features you should keep an eye out for are back closures, built-in shelf bras, and elastic bands that stretch under the busts. Swim tops should have a modest cut around the bust to keep your sides fully covered.  Another great option for full-busted women are tankinis.

Heat and UV Protection

Protect your skin by covering it with UV blocking swimwear. You don’t have to keep yourself covered up for the whole day! Consider pieces with layering potential so that you can take off or put on pieces whenever you feel it’s necessary.

Just as an example, you can start the day off with a bikini top and then throw on a swim cover-up or a rashguard in the afternoon when the sun is at its brightest. Wear board shorts over your bottom after you finish snorkeling, or layer up with a UPF hoodie.

For Intense Water Activities

Avoid anything with ties. They can easily get caught on something and get undone. Also, when you’ve been snorkeling for a while and the string occasionally brushes against you, you’re going to be wondering if a sea creature just brushed against you or if it was some kind of phantom sensation. Either way, not very pleasant to deal with.

What you should be looking for instead are suits with drawstrings or secure cross-back straps that let you cinch bottoms or tops for a stable fit. Another option is racerbacks that keep straps away from your shoulder. If you spend a lot of time in the water, you shouldn’t be concerned about if your top is about to fall off or your bottoms are rolling up.

Swimwear Care

best bikini for snorkeling

After all of that effort finding a great swimsuit for snorkeling, it would be a shame if it didn’t last long due to improper care. The more effort you put into caring for your swimwear, the longer it will look and function like the day you got it.

Below are the steps you should follow to keep your swimwear lasting for many years of fun snorkeling adventures.

  1. Rinse in freshwater after each use. Make sure to scrub thoroughly. If you’ve been in a strongly chlorinated pool or saltwater for a long time, then let it soak for 10-15 minutes.
  2. Be gentle when squeezing. Don’t treat your swimsuit like a dirty old rag. Wringing or twisting it aggressively can damage it and wear it down fast.
  3. Dry in the shade. Particularly if you have swimwear with a high UPF rating, you might think it is okay to let it dry in direct sunlight. All this does is degrade your suits synthetic fabrics faster than normal. Instead, hang dry in the shade in a well-ventilated area. You can even leave it in the bathroom with the fan on.
  4. Machine-wash sparingly. You can throw it in the washer every 3-4 uses. Make sure you use cold water with a gentle detergent intended for baby clothes and delicate fabrics. You should preferably hand-wash it each time.
  5. Always hang-dry! Don’t ever take it to the cleaners or tumble dry. Also avoid bleaching it.

Best Swimsuits for Snorkeling Recap

Hopefully now you have an idea of what to look for in a snorkeling swimsuit. Make sure to consider not just looks, but also coverage, protection, and comfort. I am confident that you will be receiving numerous compliments at the beach if you decide to wear one of the pieces recommended here.

To recap, the best swimsuits for snorkeling are not just fashionable, but have great utility as well. That means it has sun protection, security, and comfort in addition to a tight fit all in one package.

By wearing sun protection clothing, you are not only saving your skin, but also the environment by not wearing sunscreen. You are making a conscious decision to reverse our negative environmental impact and promote ocean conservation.

Lastly, ladies remember you can check out the men’s section if you want a solid pair of swim trunks to match with your tankini or sporty bikini top. As long as the waist and hip measurements are right for you, then you can definitely give it a go.

Best Anti Fog for Snorkel and Dive Masks

Snorkeling and diving is not only about viewing from a distance, but also exploring the underwater world up close. Most people are content with looking at pictures or videos, but if you are a snorkeler or diver, you can get an unforgettable first-hand experience of the aquatic world.

The mask lens is a window that provides you with a clear and unobstructed view of the marine life. As such, you must do everything in your power to ensure that this window remains clear at all times. This is crucial not only for your enjoyment, but for your personal safety as well. You must learn to take care of it so it doesn’t fog up, and the best way to do that is with a high quality anti fog spray.

Unfortunately, snorkel, dive masks, and swimming goggles have a tendency to fog up and cloud your view. In this article, we will examine the best anti fog for snorkel and dive masks to keep your mask from fogging up. We will go over the best ways you can care for and prepare your mask to keep it free and clear of fog each excursion.

Our Top Picks:

Best Anti-Fog for Snorkel and SCUBA Masks

Just Add Water Jaws Quick Spit Antifog Spray

JAWS, Premium Anti-Fog Spray for Eye Glasses, Mirrors, Plastic Windows, Swim Goggles, Diving Masks -...
  • QUICK SPIT ANTIFOG SPRAY: Now the worlds most recognized antifog comes in a spray! Quick spit spray works on almost anything that fogs, including dive...
  • LONG-LASTING: Over 200+ pumps per bottle! Works on glass and plastic
  • HIGH PERFORMANCE ANTIFOG: Apply wet or dry - Quick spit is a high performance antifog in a convenient spray formula. NOT recommended for use on...

The Quick Spit Antifog Spray from Just Add Water is the most popular scuba mask defogger on the market for good reason. It is biodegradable and comes in a convenient spray bottle so that you can quickly and easily treat your dive mask.

You can also use it to treat other masks, such as safety goggles, swim goggles, ski goggles, or any eyewear that can fog up. It’s effective on both plastic and glass lenses, as well as wet or dry surfaces where it will cling to the surface and keep it from fogging up.

The formula used in this solution is the same as the spit gel product that Just Add Water sells, but packaged in a convenient spray that lasts 200 sprays.

Pros:

  • Long lasting. Not only because you get two bottles, but the formula can last the entire day before you need to reapply it again.
  • Works on wet and dry surfaces. You do not need to dry your mask after rinsing it. It does not matter if there are a few water droplets remaining, the Quick Spit formula will cling to the surface of the lens regardless to keep condensation from forming.
  • Biodegradable. Do not worry about the Quick Spit anti-fog getting washed off into the ocean; it is made from natural products that will not harm the environment.

Cons:

  • Does not work if you touch the coating. In general, you should make an effort not to touch the anti-fog coating of any product after application, however the Quick Spit is rendered ineffective if you accidentally touch the lens.

Gear Aid Sea Drops Anti-Fog Cleaner

GEAR AID Sea Drops Anti-fog and Cleaner for Dive and Snorkel Masks, 1.25 fl oz, 2-pk, Bulk
  • Prevent dive masks from fogging underwater with these powerful anti-fog drops that perform in all water temperatures
  • Clean scuba masks with this 2-in-1 concentrated, alcohol-free formula; one 1.25 fl oz bottle contains 530 drops
  • Apply easily on all glass and plastic scuba, snorkel, and dive mask lenses; it won’t harm silicone or rubber

The Sea Drops Anti-Fog from Gear Aid is an inexpensive snorkel mask defogger that won’t break the bank. This anti-fog is very potent and can save you money thanks to how few times you need to apply it even under cold water conditions.

In addition to keeping away the fog, Sea Drops also doubles as a lens cleaner to ensure that your vision underwater is completely clear. This 2-in-1 formula is convenient, alcohol-free, and non-toxic making it safe for your eyes. Additionally, it is biodegradable, making it safe for the environment as well.

Pros:

  • Affordable. It’s cheap, and since you don’t need very much of it to be effective, one bottle will last for a while.
  • Works in cold conditions. Whether you’re deep underwater or it’s just cold out, you can expect your mask, goggles, or glasses to remain clear.
  • Gentle formula. The formula used in the Sea Drops anti-fog is alcohol-free and contains no toxic chemicals. It will not irritate your eyes, and furthermore it is biodegradable so it won’t harm the environment either. It won’t damage any silicone or rubber materials either.
  • Versatile. Apply it on your mask, goggles, glasses, binoculars, basically anything with a lens that you want to remain clear of fog.

Cons:

  • Long application time. It can take a couple of minutes to completely dry.

Innovative Scuba Concepts 500 PSI Mask Defogger

500 psi Mask Defogger Great for Scuba Divers
  • One application can last at least three dives in one day.
  • Cleans your mask with each use.
  • Wet or dry application

What makes the 500 PSI mask defogger stand out from the rest is its thicker consistency that helps it stick onto the mask lens for longer. When applying other anti-fog solutions it is very easy to miss a spot, but with the thicker consistency of the 500 PSI defogger it is easier to see where you’ve applied it.

Another benefit of the thicker consistency is that one application can last for a long time, perhaps even several dives, before needing to be reapplied. Lastly, the product comes in a squeeze bottle that should keep .

Pros:

  • Long lasting. One application can last the entire day, or multiple dives in a day, before you need to reapply more.
  • Suitable for wet and dry application. When you need to reapply, you don’t have to completely dry your mask. Just apply even if there’s some water around and it will still work great.
  • Doubles as a lens cleaner. A clean mask is a clear mask, so getting a good clean while keeping the fog away is excellent.

Cons:

  • Leaves behind a white residue after drying. The residue can accumulate in the corners of the lens, but thankfully it can be cleaned off.

Happy Snorkel Mask Anti-Fog

The Happy Snorkel anti-fog is yet another solid product that is effective at keeping your mask fog-free while being completely safe for the reef. It is non-abrasive and will not damage your mask lens whether it’s made from glass or plastic.

This product comes in a cute 1.25 fl oz bottle that will last you approximately 50 dives or snorkels. Furthermore, the Happy Snorkel anti-fog is fragrance-free with biodegradable properties making it safe for your eyes and the ocean. If you do plenty of snorkeling or diving in the reefs, this is a great anti-fog for the environmentally conscious snorkeling or diver.

Pros:

  • Small, compact bottle is easy to bring with you anywhere. Stash it in your bag or keep it in your pocket with ease. Despite the small bottle size, it can last up to 50 dives.
  • Reef safe. Some scuba mask defoggers use too many harmful chemicals that can hurt not only your eyes but the ocean as well if it leaks out.
  • Long lasting. One drop is all you need to coat your lens. You can be extremely conservative and make the bottle last for a long time. Furthermore, one drop is ideal because too much and it might sting your eyes when you’re in the water.

Cons:

  • Too many drops and it can emit a fume that stings the eyes. Follow the instructions on the proper application of this product to prevent any issues.

Which Snorkel Mask Defogger Should You Buy?

Best Overall: Just Add Water Quick Spit Anti-fog Spray.

You can’t go wrong with a product that does what it says, lasts a long time, and comes in an easy-to-use spray bottle for easy application. The Quick Spit anti-fog spray can even last for multiple dives and will save you money by preventing the need for frequent reapplications.

Best Budget Option: Gear Aid Sea Drops Anti-Fog and Cleaner.

Save some of your hard-earned cash by choosing the Gear Aid Sea Drops. It’s affordable and doubles as a lens cleaner as well. One bottle can go a long way, and in addition to how easy it is to apply, this product is non-toxic and easy on your eyes.

Longest Lasting: Innovative Scuba Concepts 500PSI Mask Defogger.

For those who SCUBA dive multiple times a day, you should consider this mask defogger from Innovative Scuba Concepts. Unlike the other defoggers, this one has a thicker, gel-like consistency that ensures the mask is properly coated and fog is kept away. You can expect the gel to last a long time and it is easy to apply to boot. You can dive multiple times in one day without having to reapply the anti-fog.

Safest for the Environment: Happy Snorkel Mask Anti-Fog.

This product is non-toxic, made from natural products, and is biodegradable. In other words, you can rest assured knowing that your mask won’t fog up and you aren’t contributing to reef deterioration. This also means it won’t irritate your eyes. With just a few drops, you can expect a safe, long-lasting effect.

Anti-Fog for Dive Masks Buying Guide

SCUBA and snorkel mask defoggers are relatively cheap and will save you from a lot of headaches and frustrations in the water. Some people argue that home remedies are just as effective, such as using diluted baby shampoo or rinsing the lens with your own spit. The former is not always reliable, and the latter some might find to be too gross for their liking.

Additionally, some mask defoggers double as a lens cleaner to ensure that your lens is completely clear while you’re in the water. In order to help you make the best choice when researching an anti-fog product, here are some factors you should consider.

Consistency

The consistency of an anti-fog can affect how well it clings onto the lens, which is necessary in order for it to be effective and helpful. You can expect the defogger to come in spray form for easier application.

Typically, the defoggers that have a thicker gel-like consistency clings to the mask for longer and thus can last for an entire day or multiple dives with just one application. However, some people prefer using spray bottles so that they can quickly and easily apply it onto the lens.

Reef-Safe and Non-Toxic

If an anti-fog contains too many strong chemicals, it can emanate harsh fumes that irritate your eyes. You should look for defoggers that are made using non-toxic or natural ingredients so that they won’t hurt your eyes. Avoid products that contain alcohol and read reviews from users to see if they complain about irritation.

Another consideration is if it is biodegradable and safe for the environment. You are probably aware that the ocean is becoming more polluted, and marine life and habitats are getting destroyed by chemicals and toxic ingredients.

The anti-fog that you use on your mask can sometimes wash off into the water, so you should check that it is reef safe and non-toxic. If a product doesn’t harm the environment, you can also rest assured that it won’t be harmful to your eyes either.

2-in-1

Some defoggers double as lens cleaners, and these 2-in-1 products can save you some hassle by simplifying the preparation process. If you really dislike the cleaning process, consider getting a 2-in-1 anti-fog spray.

Price

If the price is an issue, look for products that get you two or more bottles with one purchase. They are the best bang for your buck if your goal is to get the most value. Check the user reviews regarding the application process.

Try to find the answer to these questions. How much product do you need to coat the mask? How long does the product last before you need to apply more? Anti-fog that last the entire day or multiple dives may be better value than ones that must be applied frequently.

If money is really tight, then you can go for the home remedy option. Did you know that your spit is actually an excellent defogger? It’s also good in a pinch, such as when you’re already in the water. Spit in your mask and make sure the spit coats your lens. Rinse out the spit using saltwater and quickly put the mask on. You should have a clear mask that stays relatively fog-free. Pretty good for free, right?

Another option is to mix a solution using baby shampoo and water. Baby shampoo has anti-fog properties and also won’t irritate the eyes. Coat the lens with this solution and then rinse off with either saltwater or freshwater. Quickly put the mask on your face before new moisture makes its way into the mask.

Preparing Your Mask for Diving and Snorkeling

best anti fog for dive mask

In order for the anti-fog to work with maximum effectiveness, you must first make sure that the mask skirt and lens has been thoroughly cleaned so that there are no lingering oils or debris on the lens.

Before using your mask for the first time, consult the manufacturer’s instructions for pre-use cleaning. Some masks come with lenses that have already been treated using their proprietary anti-fog coating and may not need to be coated with anti-fog before using it.

In fact, being too liberal with cleaning may damage any defog treatment that the mask comes with. If your mask does not come with any defog coating, then before using it you should scrub it with a mild abrasive such as toothpaste and rinse well afterwards.

Even though commercial mask cleaners are effective and relatively cheap, home remedies such as non-gel, non-whitening toothpaste work basically as well. You should use a toothbrush to spread the toothpaste and keep the oils from your fingertips from transferring to the lens. Make sure to cover the entire lens and even the skirt with toothpaste.

To further reduce the chances of oils transferring, you should thoroughly wash your hands to remove any oils including cosmetic oils such as sunscreen lotion. It is important that you take these precautions because the oils will mitigate the effects of the anti-fog.

Some people recommend using fire to burn the mask lens prior to first use. The heat from the flame will incinerate the factory produced silicone layer along the inside of the lens where moisture can get trapped. This step is somewhat controversial, as improper heat treatment can cause the silicone skirt to melt. There is also a low risk of burning yourself.

Keeping the Mask Fog Free

how does a snorkel mask work

The reason that masks fog up is due to a build-up of moisture inside that condenses on the lens. Even though mask fogging is a major issue, there are numerous simple solutions to keep the fogging to a minimum. For instance, defogging solutions are effective as surfactants that cover the lens and minimize condensation.

Be prepared to clean your mask and to reapply a defogging solution each time you head out into the water. Recently, some defogging solutions have become longer lasting, able to last an entire day of snorkeling or diving. These solutions can be found in gel, drops, paste, or spray bottle form.

Application of the anti-fog varies from product to product. Some are rubbed on the lens and left to dry while others are sprayed on. Before diving, you can even buff your lenses clean. There are many options nowadays to defog one’s mask and the methods keep on improving.

With that said, the tried and true methods of using saliva or diluted baby shampoo still work if you don’t have any anti-fog on hand.

Common Ways to Prevent Fogging

If you followed the steps above and still experience fogging, then here are some additional tips you can try out.

  • Double check the seal on your mask. A mask that doesn’t seal properly on your face can lead to fogging (and water leaking). Fogging will occur if there is moisture, and if water is seeping in then it can also rinse off the defog solution that you worked so hard to apply. To strengthen the seal, you can try applying mask sealant or silicone grease along the skirt.
  • Before sealing the mask skirt on your face, make sure no hair is in the way. An easy way to do this is to wet your hair and then slick it to the back. Next, feel around the mask skirt to ensure no stray strands are in the way before forming the seal.
  • Exhaling through your nose increases the moisture in the mask. You will have to do this in order to equalize the pressure, so keep it to a minimum.
  • How careful were you not to touch the mask with your fingers? Remember, the natural oils on your body can prevent the anti-fog from working.
  • Do not expose your mask to sunlight for too long. The increase in temperature can cause condensation to form along the lens. Try to face away from the sun when you are along the surface.
  • After each snorkel or dive trip, thoroughly clean your mask in soapy, warm water to get rid of any lingering oils or residue that may have found its way onto your mask. Let the mask fully dry before storing it away.

Mask Defogging on the Fly

snorkeling equipment

There will be times when you’re out in the water and your mask starts to fog up. Maybe your defogging techniques didn’t work or you made a mistake, whatever the case you now have to deal with a cloudy mask.

You can try washing your mask, also referred to as clearing your mask. To do this, intentionally break the seal on the bottom of your mask and let a small amount of water rush in. Tilt your head down and swish the water side to side until it has rinsed off the fog. Lastly, forcefully exhale with your nose to clear out the water and close the seal to stop water from seeping in.

If you’re by the water’s surface, you can use your saliva as a natural defogger. Spit and thoroughly coat the inside lens with your saliva. Rinse off the saliva using the ocean water and shake as much water droplets as you can. Quickly seal the mask on your face before more moisture gets in.

Best Anti-Fog for Snorkel and Dive Masks Recap

There are many anti-fog products on the market, and they help prevent fogging up in both traditional masks and full face snorkel masks.

In addition to their mask defogging properties you should look for ones that are non-toxic, reef-safe, and long-lasting. You can get anti-fog in gel or spray form. One is not necessarily better than the other, but most people prefer to use a spray bottle to defog their lens.

As part of the defogging process, you must first thoroughly clean your mask because any oils or debris along the mask can render the anti-fog ineffective. Some anti-fog products double as lens cleaners so they can simplify this process.

Even after you’ve treated your mask, you should be aware that you can still cause your mask to fog if additional moisture enters the mask, such as when you exhale or water seeps in. Try not to remove your mask much, if at all, since this breaks the seal and allows moisture from the air to enter which is enough to cause fogging.

Next, it is important to limit how much you exhale with your nose, using it only to equalize the pressure when diving. Low volume masks are better suited for this since it requires less air to equalize. You should also ensure the mask skirt seals tightly against your face.

Lastly, avoid drastic changes in temperature which can result in condensation forming on the lens. This often happens when you surface and allow the sunlight to heat up the air in the mask. Try to face away from the sun or try not to surface for long. If you follow these guidelines, you can find a great anti-fog product and keep your mask free fog-free while snorkeling or diving.

Best Underwater Camera for Snorkeling

Few things in life can compare to the magical beauty of snorkeling in a coral reef that is bustling with sea creatures that you normally don’t see. Count yourself lucky to see a few reef sharks, sea turtles, or manta rays on your trip. The few times that I did, I was glad to have my underwater camera with me to capture that moment forever.

You can find plenty of pictures other divers took of rare aquatic creatures or an amazing view of the reef. However, nothing compares to the joy of shooting your own pictures and footage, especially if your family members are forever immortalized in the shot. To reliably shoot great underwater footage and pictures, you need to get the best underwater camera for snorkeling.

In this guide, we’ve put together a list of our top recommended waterproof cameras, as well as the criteria we used to come up with our selection.

Our Top Picks:

Olympus Tough TG-5 Waterproof Camera – Best Overall

OM SYSTEM OLYMPUS TG-5 Waterproof Camera with 3-Inch LCD, Red
  • New 12 megapixel Hi speed image sensor for improved low light performance and noise reduction
  • Underwater compensation: 2 EV to +2 EV (in 1/3 EV steps); Bright F2.0 high speed lens; Video recording format: MOV(MPEG 4AVC/H.264)
  • Dual quad core TruePic VIII image processor 3.0 inches 460k Dot LCD monitor; Focus range normal: 3.94 inches (10 centimeter) to infinit macro: 0.4...

The Olympus Tough TG-5 waterproof camera is the best all-around underwater camera for snorkeling on the market. It comes with many professional features and is one durable camera. In addition to being waterproof, it’s crushproof, shockproof, freezeproof, and even dustproof. Beyond its ruggedness, you have a camera that is also fantastic at shooting both photos and films at 4K resolution.

Durability

Cameras are very delicate and expensive tools and people will go to great lengths to protect their investment. Olympus knows how heartbreaking it can be to damage or break a camera, that is why they made their Tough TG-5 camera near indestructible.

Waterproof

First, how deep underwater can you use this camera? The Tough TG-5 is waterproof up to a maximum depth of 15 meters, which is more than enough if you’re casually snorkeling and diving. For those who want to use it while scuba diving, you will need to purchase the specific TG-5 housing to protect it at depths exceeding 15 meters.

Shockproof

Next, the TG-5 is capable of surviving a nasty 2.1 meter drop, making it ideal for use outdoors even in the rain. We love how versatile it is, capable of being used both underwater or for other outdoor activities and excelling in all areas. However, if you drop the camera in deep water then it’s probably gone, so hold onto it!

Freezeproof

This is a nice feature to have, though you probably won’t need to use it if you just plan on snorkeling. However, the option to use it in the winter is nice. After all, why limit yourself to using an underwater camera only in the water? The TG-5 Olympus can withstand freezing temperatures as low as -10 degrees Celsius.

Dustproof

All water activity is near sand, and when you go on your adventures you will likely expose your camera to sand or other particles. Even if there are no beaches nearby, you can still find particles in the water.

Crushproof

The last feat of strength the TG-5 is capable of is withstanding crushing force up to a maximum of 100kg. For reference, that is equivalent to a NFL quarterback or a giant panda stepping on it. I don’t even know how the average person can drop 100kg onto this camera unless they drive over it with a car.

Picture Quality

The Olympus Tough TG-5 comes with a F2.0 wide-angle lens that is incredibly fast and ideal for shooting footage and pictures of the underwater coral reef. It produces high resolution footage as well as pictures with incredible image quality even in low-light conditions thanks to its dual quad-core processor and specialized image sensor.

What makes the TG-5 waterproof camera ideal for snorkeling is its underwater shooting modes that help you customize the shots you can get. The settings include underwater wide, snapshot, and macro for when you want to get those excellent close-up shots.

Next, there is also the underwater HDR mode which overlays multiple images to produce photos that have enhanced shadow and light. This particular mode is great for capturing all of the details and color when you’re swimming with sea turtles.

Additionally, this waterproof HD camera from Olympus can capture fast-moving action shots in stunning detail. The pro capture mode in the Tough TG makes taking those awkward, split-second photos much easier. How?

The camera will buffer a continuous series of high-resolution images, and then once you hit the capture button, it will select the image from that exact frame plus the five previous frames so that you can get the best photo of a fast-moving shark or somebody bungee jumping with great clarity.

Camera Design

When you’re underwater you can’t be fumbling around with a camera; it needs an ergonomic design that is easy to handle. The design of the Olympus has been carefully considered so that you can easily use it even with gloves on.

For example, the dial lets you cycle through the modes very quickly, and there is an option for custom modes so that you can customize how you can access your preferred settings.

There’s even a live composite mode that makes filming amazing star trails and cityscapes easy.

Next, the microscope modes on the Olympus Tough lets you get really close to your subject (as close as 1cm) so that you can capture all of the astounding details found in all of the coral, fish, or anything that catches your eye in the underwater world.

Lastly, for those who want to create images that are sharp and crisp, as well as maximize the depth of field, then the Olympus camera has stacking and focus bracketing modes to help you to this end.

Add-Ons

When you buy a camera, you’re never just buying only a camera. There are always more accessories to buy, such as additional lenses that can help you take better photos underwater with the TG camera.

For instance, you could get the Waterproof FCON-T01 Fisheye Converter Lens for the Olympus if you are keen on taking more ultra-wide shots.

Next, while the zoom on the TG-5 is quite good at 4x, with the Waterproof FCON-T01 Teleconverter Lens you can get up to 7x zoom, nearly double what the stock camera can do!

Even though we generally recommend getting up close and personal to the subject for the best shot, sometimes it can be dangerous to do so, and for those situations having a strong zoom is the safest option.

You might also be interested in the LG 1 Light Guide, which provides macro lighting that utilizes the camera’s built-in LED illuminator to provide a stronger light.

To get better light distribution underwater, consider trying the Waterproof FD-1 Flash Diffuser to provide additional light up to 30cm.

Lastly, the PT-058 waterproof housing case extends the Tough’s underwater capacity to a maximum depth of 45m, three times what it is normally rated, and a great option for scuba divers looking to document their dives.

Ultra 4K Video

If a picture speaks a thousand words, then how much more does a video speak? With 4K video, each frame captures millions of pixels, and the TG-5 is capable of capturing extremely smooth footage at 120 FPS.

Impress your friends and family with crisp and detailed footage that you can carefully appreciate with slow-motion playback, as well as a time lapse setting to make sped-up videos of the bustling coral reef over the course of the day.

Action Track Sensors

Avid snorkelers and divers, have you ever found a serene and beautiful snorkeling spot like none you’ve ever seen, but then couldn’t find that exact spot the next time you head back?

No matter where your adventure takes place, you can track the environmental data and your movement through it using the built-in Action Track Sensors.

Never lose track of where you are ever again with the TG-5’s GPS to find your latitude and longitude, a manometer to measure water depth and altitude and temperature sensor, and a compass for direction.

Furthermore, you can pair the camera to your phone with the free Olympus Image Track app to manage the videos and photos using your smart device with data or Wifi. Check the image’s metadata after you’ve exported them with data overlays to find out all of the information you need about your adventures.

Wifi

How does the camera pair with the phone? Thanks to its built-in Wifi, you can share data without needing to connect it to a computer using a cable. Share photos and videos immediately after shooting them using the Olympus Image Share App.

You can even remotely operate the camera using your phone to adjust the camera’s settings and take pictures remotely, which is great for taking family photos with you in it as well.

Battery Life

With all of these advanced features, just how much juice does this camera need to operate? If you are making use of all of its features, particularly the GPS and Wifi, then it will cause the battery to drain quickly.

Make sure to keep the camera plugged in using a standard USB cable to keep it topped off. You can recharge it anywhere a USB slot is available, a desktop PC, laptop, your car, a USB outlet, etc.

The Olympus TG-5 also comes with its own AC charger. On a full charge, you can expect to take 340 shots before it runs out of juice, which is within the range of the other market leaders.

Overall

The Olympus Tough TG-5 comes with many great features that make it a versatile and reliable underwater camera for snorkeling. It’s no surprise that it’s considered to be one of the best on the market, and makes it on our list as the #1 underwater camera for the average snorkeler, factoring in the cost and ease of use.

Personally, we feel that the macro mode and 4K video produces raw footage with incredible clarity which lets you edit it in post-production with much more freedom. Even if you uploaded the footage as is, it will no doubt still be stunning.

Furthermore, the Olympus Tough TG-5 works great outside of the water too thanks to how durable it is, it really is a versatile and useful underwater camera that can also be used as a travel or outdoor camera. It fits snugly in your pocket thanks to its compact body, and has all the features you need at an affordable price. We highly recommend the Olympus Tough TG-5 underwater camera.

Nikon W300 Coolpix – Most Durable

Nikon W300 Waterproof Underwater Digital Camera with TFT LCD, 3", Orange (26524)
  • Waterproof, freeze proof, shockproof and dustproof adventure camera with extra capabilities
  • Stunning high resolution photos, 4K Ultra HD videos, Time-lapse videos, Super lapse videos and music montages
  • 5x optical zoom NIKKOR lens with telephoto power and Hybrid VR image stabilization

Those of you looking to take more photos in the midst of action rather than off by the sidelines should consider getting the Nikon W300 underwater camera. This camera is designed for shooting action videos and photographs easily, and that makes it a great camera for snorkeling.

Durability

It can shoot 4K ultra high HD video and take 16 megapixel photos. Furthermore, it can withstand a lot of punishment. The Nikon W300 can withstand the water pressure down to depths of 30m (twice as deep than the Olympus TG-5), can endure drops from 2.4 meters, can resist the cold up to -10 degrees Celsius, and will keep out all sand particles from the beach and water.

Picture Quality

When you’re struggling to take the perfect photo, you can check out any of the 20 shooting modes to help you, including an underwater mode as well.

The camera has a 16 megapixel low light sensor paired with a fast F.28 zoom lens to help you snap photos with extreme clarity even in low visibility conditions.

Next, the autofocus capability  and continuous shooting mode simplifies those fast-paced action shots, and the macro mode can help you get microscopic detail on your subject up close.

Design

The Nikon W300 is designed with ease of use in mind which is why it customers rate it as one of the best underwater point and shoot cameras. It’s body is designed such that you can switch between modes quickly and easily, even when you’re in the middle of snorkeling. The smart button and extra-large grip frees up one hand to take one-handed photos.

Additionally, the 3-inch LCD screen and anti-reflective coating means you can still see what you’re shooting and to reduce the glare from the sun. The dedicated Tool button brings up the tool menu to help you access useful features such as the GPS or compass conveniently.

Next, the Nikon W300 comes with a bright LED light that helps you light up your subject even when you’re deep underwater and visibility is poor. You can attach the Nikon underwater camera to a tripod or pole and use the self-timer function to take selfies or group photos easily.

Video Quality

Once you hit the record button, that’s when the magic happens. The Nikon W300 has many video modes that can help you make fun and interesting videos. For instance, the short movie show mode can be used to produce 30-second video compilations complete with background music and special effects, which is great for quickly editing a video and sharing it with family and friends online.

You can condense several hours worth of footage into a sped up 10-second time lapse sequence. Or, you can do the opposite and make a super lapse video instead. If you’re struggling to take a photo of a subject that just won’t hold still, record it with a video instead and shoot stills from the footage you captured instead.

Wifi

The Nikon also has Wifi and Bluetooth functionality built-in to help you seamlessly transfer pictures or footage to your smart device and upload it online to impress friends and family.

You can even add a personalized touch in the form of caption text, and the snap bridge phone app will store your photos online to Nikon Image space. You can take pictures remotely with your phone if you have this app.

Fujifilm FinePix XP130 – Most Affordable

Fujifilm FinePix XP120 - Sky Blue FinePix XP130 Waterproof Digital Camera, 2.78' x 4.34' x 1.26',...
412 Reviews
Fujifilm FinePix XP120 - Sky Blue FinePix XP130 Waterproof Digital Camera, 2.78" x 4.34" x 1.26",...
  • 16.4 MP BSI CMOS Sensor
  • Waterproof to 65ft/20M, freeze proof to 14 Degree/-10 Degree, Shockproof to 5.8ft/1.75M, and dustproof
  • Fujinon 5x (28-140mm) wide angle optical zoom

Next up, we have the Fujifilm waterproof camera which is a budget camera that still has a great suite of features for the money-conscious buyer. One thing that is common with the underwater cameras we recommend is that they are all rugged and robust, including this one.

Durability

First, on its own it is waterproof to a maximum depth of 20m, not quite on the same level as the Nikon W300, but more than the Olympus Tough TG-5. Like its industry-leading peers, it can withstand the quote up to -10 degrees Celsius, keep the dust and water particles from entering the body, and can endure a respectable 1.8 meter drop.

Image Quality

The spec on the Fujifilm Finepix is not as good as some of the other cameras, but keeping in mind that this is a budget option and a fantastic waterproof camera, let’s look into what it can do.

To start, you can shoot in two modes to help you optimize your underwater photos. There’s the underwater mode which guarantees that the photo you’re taking is true to what the human eye can see (recall that the color red frequently doesn’t show up in underwater photos). Using this mode, you can get beautiful images that have precise, crisp, and intricate detail.

Next, the 16.4 megapixel CMOS sensor ensures that the image quality is high when you’re deep underwater and light is lacking. The Fujifilm FinePix comes with an image stabilization feature that fixes camera shake in your photos. This is especially useful when you’re underwater and struggling to stabilize your body.

In order to further improve your photos, the FinePix gives you the choice of 11 special filters to modify the photos and add cool effects instantly.

There are also 7 filters for movie recordings that you can apply, and the LCD screen will allow you to preview them before you apply the enhancements to get the optimal result.

Additional Features

The Fujifilm FinePix can be paired with your smart device to transfer data such as the time zone and location to help you remember where you were and when you took the photos or video footage. You can also operate the camera from your tablet or phone using the Fuji Camera Remote app, allowing you to change the zoom settings, shutter release, camera mode, and video mode.

Next, the 3-inch LCD monitor on the Fujifilm FinePix is very spacious considering its compact frame. It has an anti-reflective coating which is easy to clean and glare-free, which reduces the eyestrain when using it under extremely sunny days.

To keep the battery from draining unnecessarily and to optimize visibility, the Fujifilm FinePix can automatically decrease its brightness setting as it analyzes the lighting conditions.

Furthermore, the LCD screen comes with the electronic level feature, which helps you take level horizontal shots like landscape photos easily. The eye detection feature will automatically detect and focus on the eyes of your subject for an easier time taking portraits.

Image sharing can be done in a snap with the Fuji Bluetooth connection or Wifi. Transfer your shots to your tablet or smartphone, and you can even transfer images to a wireless printer for easy printing.

Video Quality

Next up, let’s talk about video quality. The Fujifilm XP130 can record footage at 1080p resolution and 60 FPS. While this is nothing special, this camera comes with its high speed movie mode that lets you record at significantly higher FPS at the cost of video resolution.

You can even record at 320 FPS for incredibly smooth and detailed action footage, though the resolution will be very small. However, with this many frames you can slow it down and watch things step by step to ensure you don’t miss out on any details.

Furthermore, the Fujifilm FinePix XP130 has a solid 5x (28-140mm) optical zoom lens that lets you get close shots of the action from a distance. Combined with its intelligent digital zoom lens, you can essentially get a 10x zoom. Additionally, this camera has an optimum image processing feature that will alleviate any degradation of image quality as you zoom closer using the zoom.

Panasonic Lumix TS7 – Best Depth Without Housing Case

Panasonic DC-TS7D Lumix TS7 Waterproof Tough Camera, 20.4 Megapixels, 4.6X Zoom Lens, USA, with 3"...
  • [Waterproof] Snorkel with confidence down to 102 feet, plus enjoy drop protection to 6.6 feet and Freeze proof to 14 degrees f
  • [Picture quality] capture low light photos with a 20.4 Megapixel MOS sensor, and record video in smooth 4K 30P quality
  • [Lens] high-quality 28mm wide-angle with up to 4.6x optical zoom range

Rain or shine, underwater or on land, you can count on the Panasonic Lumix TS7 to provide photos and footage with exceptional image quality.

Durability

In terms of durability, how does this camera hold up to the market leaders? Right out of the box the Lumix has the best waterproofness at depth, as it is capable of operating at a depth of 31 metres or 102 feet without a housing case.

Second, like the other compact cameras in this review, it can withstand drops from a height of 2 metres and function even in -10 degree Celsius conditions.

Like the Olympus Tough camera, the TS7 is crushproof up to 100kg, which means a very large male would have to place the full force of their body weight on the camera to crush it. Lastly, the camera body is dustproof and will keep out all particles from entering into its delicate insides.

Features

The Panasonic Lumix has a 20.4 megapixel sensor paired with a stabilized zoom lens to assist you in taking exceptionally clear and high quality photos even in dim light conditions. Next, the 28mm wide-angle lens can zoom up to 4.6x magnification for when you want to take a closer look from a distance.

To better see what you’re doing, the 3-inch LCD screen has a high resolution display and the live viewfinder simplifies the task of capturing subjects underwater or in bright light. The Lumix TS 7 comes with an optical image stabilizer that can reduce the shaking when filming underwater or during outdoor activities while holding the camera with one hand.

4K Ultra HD Video

The Lumix records videos at 4K resolution at 30 FPS, not the greatest in terms of frames per second but at least it can record in ultra HD. Outdoor photographers will love how the 4K technology lets them capture 4K still images from the footage. When you select a frame from a video sequence, it will save a copy of that frame as an eight 8 megapixel high-quality still.

Never forget where you took your photos by letting the Lumix embed the GPS location to the metadata. You can upload the pictures you took using Wifi and the free Panasonic Image app. Lastly, monitor the depth and the direction you’re facing with its built-in altimeter and compass.

GoPro Hero 7 – Best Hands Free Camera

Sale
GoPro Hero7 Black — Waterproof Action Camera with Touch Screen 4K Ultra HD Video 12MP Photos 720p...
  • HyperSmooth: Get gimbal‑like stabilization—without the gimbal. HERO7 Black corrects for camera shake to deliver insanely smooth footage
  • TimeWarp: Capture super stabilized time lapse videos while you move about a scene. Increase the speed up to 30x to turn longer activities into...
  • Live streaming in 720p: Share while you’re there. Live stream in 720p on social, get HyperSmooth stabilization as you broadcast via the GoPro app...

When people think of an action camera, they think of a GoPro. Whether you’re doing extreme mountain biking, jumping out of a plane, or diving underwater up to 33ft deep, the GoPro can withstand all of this punishment while recording footage at 4k60FPS. It would actually be considered quite tame for this camera to only be used for snorkeling, and it can perform well both above and below the water as well.

The GoPro Hero 7 comes with plenty of new features, including 720p live streaming directly to Facebook Live using the app on your smart device. However, this feature does not work when you’re underwater.

Video Quality

The Hero 7 records at a respectable 4k resolution at 60 FPS that will leave your family and friends in awe of not only the action being shown, but also the quality of the footage. The high frame rate gives you options, for instance you could slow down sections of the footage for dramatic effect, and the extra frames means it will look buttery smooth.

Designed with usability in mind, the simple touch screen is easy to operate, and navigating to the three main capture modes can be done in a jiffy. Like smartphones, the Hero 8 can be operated with voice controls for hands-free operation. Unfortunately this can’t be done underwater, however the option is there any other outdoor activities you might want to record.

Keep video shake to a minimum with GoPro’s hyper smooth video stabilization functionality that will try to predict your movements and auto-adjust the footage to hide and camera shake for a surprisingly stable end result.

While moving around a scene, this camera can help you capture a stabilized time-lapse video with its TimeWarp feature, and then increases the speed by 30x to turn them into one of those cool time-lapse videos to show the passage of time.

Image Quality

While the GoPro cameras are primarily intended for video footage, the Hero 8 can take great photos as well. You can take a picture in RAW format, and automatically the camera optimizes your photos by adding HDR and reducing noise.

Next, the photo time mode makes taking selfies a snap. Thanks to its 12 megapixel sensor, even photos taken in unfavorable conditions while no doubt turn out good.

Panasonic Lumix TS30A – Budget Camera Alternative

Panasonic LUMIX Waterproof Digital Camera Underwater Camcorder with Optical Image Stabilizer, Time...
  • Quad proof, tough camera – made for active lifestyles, this rugged camera is waterproof (to 8M/26ft.), shockproof (to 1. 5M/5ft.), dust & Freeze...
  • Mega O. I. S. Camera lens automatically compensates for blurring caused by handshake movement. Detected instantly by a sampling frequency of 4, 000...
  • Beautiful Underwater shots The Red color Reproduction of advanced underwater mode easily compensates for the red tones easily lost in underwater...

Though this camera does not have as many features as the others mentioned in this article, we feel it is worth mentioning another budget option for casual snorkeling photographers who want to try out this hobby without spending a fortune. It can record footage and take pictures just fine, though the quality will not be top of the line.

Image and Video Quality

Let’s go over some of this camera’s photo features. It has an underwater mode that compensates for the lack of red tones in underwater pictures. This helps to make the images look “as it should” by digitally adding the red back into the photos.

Next, the Lumix TS30A takes some of the pressure off of stabilizing the camera by auto-correcting for small movements to keep your images clear and sharp.

Using the creative panorama feature, you can overlay consecutive images for an ultra wide shot. The Lumix lets you apply special filters such as sepia or retro using its creative controls so that you can retouch or transform the images to your liking.

Switching between taking pictures or filming video can easily be done with the press of a button. One nice feature of this camera is its 220mb of built-in storage. When you’re busy snorkeling and find that the SD card is full, that extra 220mb can come in handle to let you take an additional 34 pictures.

Additional Features

At even just a few feet underwater, the lighting conditions can worsen dramatically. But with Lumix’s built-in torch, you can temporarily illuminate the area to add some extra clarity to your images and videos. Even when you’re not filming, you can use the torch to help you see where you’re going.

Time-lapse shooting is an option with the time-lapse video mode. Even though you probably won’t use this mode underwater, it doesn’t hurt to have extra features that you may use elsewhere.

The biggest downside to this camera is that it can only be used at a maximum depth of 26 ft (8 meters) and its battery life will only last for 60 minutes of continuous use.

However, we can’t complain too much since it packs a decent amount of features into a budget camera. For snorkelers who want to take a few photos underwater but don’t want to break the bank, the Panasonic TS30A is a great entry camera.

Best Underwater Camera for Snorkeling: Buying Guide

What makes one underwater camera “good” and another “bad”? If a camera can shoot footage underwater, what else is there to consider? If you want to capture those once-in-a-lifetime moments of you and your family forever in the highest quality possible, then before you purchase an underwater camera for snorkeling you need to consider the factors below.

Price

Cameras and camera equipment are big ticket items, and unfortunately price will always be a major concern. Even a “cheap” underwater camera with the barest of features costs over a hundred dollars. The higher end cameras are expensive and jam-packed with features, but the question is how useful are they for your purposes? Do the extra features justify the higher price tag?

First, let’s use some real numbers as examples. The cheapest cameras are around $150 and possibly even less if you can get a good deal. Mid-range cameras are somewhere in the $150-$500 dollar range. The high-end cameras are going to cost you an arm and a leg; they can easily be in the $1000 range.

Those who are into photography should know that camera equipment is an endless money sink where there will always be more expensive gear for you to buy, whether it be new lenses, tripods, or tools to carry it. Beginner or even intermediate snorkelers just getting into snorkeling photography won’t need to get the best camera.

If you just want a camera that is the best bang for your buck, we recommend a mid-range camera in the $150-$500 range. That is the sweet spot for a durable and reliable camera with sophisticated features at a price range that is still feasible for most people.

For those on a tight budget, then you have no choice but to go for the sub-$150 cameras. Don’t worry, the standards for underwater cameras are very high, and even the budget cameras are still capable of getting the job done. They will just come with less features. Budget cameras are the ideal choice for people who don’t snorkel often, but still want to have some pictures to look back on.

Remember how we mentioned that cameras and camera equipment are just an endless money sink a few paragraphs above? Despite many cameras costing less than $150, you should expect to spend additional money to purchase even more equipment down the road such as the camera housing, a camera pole, external lenses, and strobes.

These are costly, often as expensive or even more expensive than the camera itself. Think about this when you are planning which camera to purchase.

Another tip that may help you future-proof your investment is to buy a high end camera right off the bat so that you won’t have to upgrade as quickly or need to buy extra gear to make up for lack of a feature in a cheaper camera.

best compact camera for snorkeling

Waterproofness

Each waterproof camera has a limit in regards to their maximum depth they can be used. You don’t want your underwater camera to be ruined by water because you didn’t follow instructions. That would be a costly mistake.

Some people looking to save money recommend using a normal camera but putting it inside a waterproof pouch and using it at shallow depths. Yes, that works, however the quality of the pictures and footage you take will not be very good.

We recommend using a camera that is specifically designed to be used underwater, or investing in high quality equipment such as a housing case instead of a cheap pouch. Also, keep in mind the depths which they can be used at. Most waterproof compact cameras have a maximum depth of 10 to 15m. If you only intend on snorkeling, this is more than enough.

Scuba divers might want to invest in a watertight housing case for their DSLRs. These can be used much lower at depths of 40m. Lastly, you can use action cameras or GoPros at depths of 60m. Before purchasing a camera, think about how deep you plan on diving and make sure you get a camera that is waterproof at those depths.

Megapixels

One of the things you’ll notice every camera advertises is how many megapixels it has. For those who aren’t aware, one megapixel is equivalent to one million pixels. When you zoom in close on a picture using image editing software, you can eventually see tiny square blocks of color, and those are the pixels.

In other words, the higher the megapixels, the larger the image will be which gives you more options in terms of image quality and cropping. The downside is that more pixels it occupies more memory, meaning you will run out of storage space faster and it takes longer to transfer and download any footage.

If you plan on printing the photos or editing footage further, then you want a camera with the highest megapixel count. For the most part, a 10 megapixel camera is enough for printing high quality A3 photos.

Sensors

How big the camera’s sensor is correlates to how much light it can capture. Cameras need light to take photos and film. The more light the better your footage will turn out, ergo the bigger the sensor the better the camera.

For underwater compact cameras, you will usually see one of three sensor ratings which are typically advertised in inches. All of the compact cameras we recommend in this article have a  1 /2.3” sensor which is the best you can find for a compact camera.

Optical Zoom

If you will be using the camera exclusively underwater then the optical zoom is not as important of a feature since you should be taking the pictures as close as possible to the subject to minimize the amount of particles in the frame.

A camera’s focal length is measured in millimetres, and the larger the number the more it can zoom in. However, a lower number is better at taking wide-angle shots. When looking for a camera, keep in mind the minimum and maximum points that the camera can zoom to. The higher number is the maximum zoom, and the lower number is the widest angle available.

Macro

The best underwater cameras for snorkeling will have macro lenses that let you focus on a subject for an extremely detailed close-up shot. The cameras will usually have different macro modes to let you adjust the shot as you want.

Video Recording

best waterproof camera for snorkeling

Warning: more nerdy pixel talk coming up. Many cameras nowadays can record footage at 4k resolution, which means the footage captured is 3840 x 2160 pixels in size per frame. They can capture silky smooth videos at 60 frames per second or even 120 FPS, but most cameras only record at 30 FPS. The higher the FPS, the smoother the footage since more frames are captured per second to display to the viewer.

As you can imagine, the file size of the raw footage is absolutely ridiculous, and you would need a powerful PC to edit and render the footage as well as several hundred gigabytes of drive space.

If 4K footage seems too daunting to handle, the next best thing is high definition (HD). The most common HD resolutions are 1080p or 720p. This refers to the vertical lines of resolution, which is why 4K is sometimes referred to as 2160p. In this case, the larger the number, the better image quality you will get.

How Important is Filming Video vs. Taking Pictures for You?

This is an important consideration because colors are absorbed at varying depths. For instance, at only a short depth of 5ft., there will be a substantial loss of the color red in your footage. Furthermore, factoring in the horizontal distance from your camera lens to the subject, there is a possibility that all traces of the color red will be absent from your footage.

In order to limit the water’s color absorbing effects, you need to have a dive light that can evenly illuminate the subject with no hard edges. You’ll also need to edit the raw footage that your camera produces in order to enhance the depth of color and contrast to your footage and pictures.

If you prefer to shoot film while snorkeling, then a camera with higher FPS should be prioritized. Also, try to get a camera that can record in 4K resolution. Remember, the more pixels and frames that you have to work with, the more you can do in post-processing.

WiFi

If you simply cannot wait to share your spectacular underwater images with family and friends then a camera with Wifi capabilities may be something you should consider. Built-in Wifi is not a feature you should expect most cameras to have, however it is starting to gain traction.

Of course, with each new feature comes a higher price tag. Furthermore, you need access to the internet for Wifi to work. You could set up your phone to provide a hotspot, but this drains your phone’s data and battery and is not useful if the area has bad reception.

In many cases, you will find yourself relying on free public Wifi, which is usually very slow and unreliable. However, if you all need to do is upload a photo or two as a teaser for your family and friends on your preferred social network, then perhaps public Wifi will suffice.

Camera Type

Another thing to consider is the type of camera you want to use, since this affects how you will be carrying it underwater. Compact cameras are small and can easily be carried by hand. Larger DSLR cameras in a housing case should be used with a stabilizer for better grip and camera footage.

GoPros can also be used with a stabilizer, or you can attach them to your snorkel mask. Attaching a GoPro to your mask is not ideal for taking photos, since you can’t really see what you’re aiming at nor can you easily access the camera’s features. It’s better if you just want to film a POV (point of view) video of your snorkeling and diving adventure and take pictures of still frames from the footage.

There are pros and cons to each camera type, however how you intend to use the camera is often the deciding factor (price is an issue as well to a lesser extent).

snorkeling camera in housing

Disposable vs. Non-disposable Cameras

There is actually an option that is even cheaper than what we mentioned above. If you’re truly strapped for cash, you can consider using a disposable camera to take pictures of your snorkeling trip. That’s right, there are no strings attached. Just point and shoot, get your photos, and toss the camera in the trash.

Since you can only use the camera one time, they are not very expensive. They won’t give you the greatest quality photos, but depending on who you ask they may or may not be able to get the job done at a satisfactory level.

Reviews on disposable cameras are mixed. Some people are happy that they were able to get a few good photos before tossing the camera away. Others claimed that every single photo was terrible and that it was a complete waste of money.

We don’t recommend them personally, but felt we should bring it up as an option in case it strikes your fancy. We think even buying a budget compact underwater camera would be a better use of your hard-earned cash.

Skill Level

Are you a professional or an amateur photographer? You may want to purchase a higher end model that provides more features, or if you know exactly what you want, then you can try to find a camera with the exact features you want and no more.

If you get a cheaper model underwater camera, you can then use the money that you “saved” to purchase additional accessories or upgrade equipment. With that said, beginners who have never snorkeled with a camera before should consider budget options.

Housing Case

If you are not satisfied with the underwater cameras on the market, you can look instead for a durable housing case for a regular camera instead. We mentioned this briefly in the Price section above, but a housing case is a popular choice for compact cameras as well as SLRs.

The issue with this is that housing cases are not only expensive, but finding a case that matches your camera can be difficult. Not only will you have to find one with the right ports for your lenses, but each dive can be nerve-wracking because you have to meticulously check if each seal is still holding strong.

A casing or housing case can be a headache for hobbyists compared to purchasing a waterproof camera. It is not recommended for the hobbyist snorkeler and photographer, but for professionals or enthusiasts who have the money to spare.

Size

Smaller, more compact underwater snorkeling cameras are becoming the go to option over DSLR cameras. The reason for this is because of how convenient and affordable they are. DSLRs with a housing case and underwater handles are bulky and prohibitively expensive for the average person.

The bigger the camera, the harder it is to carry it underwater which can dissuade people from buying that specific model or camera type. This depends largely on personal preference, but most people are willing to sacrifice features just to get a more compact camera that they can easily bring with them while traveling and snorkeling.

For some, they are willing to deal with lugging around very heavy and expensive pieces of camera equipment as long as the photos and footage they take are award winning.

The Bottom Line

A lot of people will balk when they find out how much money you invested on underwater camera equipment. They will tell you to put the camera down and just enjoy the moment. While there is truth to this sentiment, one may wish to take themselves out of the moment to preserve it for their family’s enjoyment forever. Some moments are worthy of being captured and experienced over and over again.

Human memories are fickle, and even “unforgettable” moments will alter over time. Thankfully, camera technology has advanced to the point that even a layperson can buy a waterproof camera and take some decent footage. In the future when you look through your vacation album you won’t have to wonder why there aren’t any photos or footage of the family snorkeling in the water with the help of an underwater camera.

By taking into consideration the camera buying guide and the recommended cameras in this review, you can find a camera that is in the ideal price range with the exact features you want to take great photos and video footage of you and your family’s underwater escapades.

Water Ski Belt for Snorkeling Buying Guide

Water ski belts are a great tool to help you stay afloat while snorkeling to make the overall experience more relaxing. If you’ve always wanted to try snorkeling but felt left out because you were afraid of the water, then you can use a water ski belt to assist you. Flotation devices such as a swim belt can take the stress out of snorkeling, allowing you to experience the beauty and tranquility of the ocean without worrying about your safety.

With the help of a flotation belt, you can join your friends and family in the water even if you have little to no swimming experience. Additionally, seniors or those with physical disabilities can experience the joys of swimming and snorkeling again. The flotation belt will help them conserve precious energy, allowing them to stay in the water for longer, and keep them afloat in the event of an emergency.

In this guide, we will go over the benefits of water ski belts and how to select the right one to keep you afloat while swimming or snorkeling.

Water Ski Belt Buying Guide

When you are shopping for a water ski belt, there are numerous things to keep in mind. Despite being such a simple device, one should not skimp out on features that could lead to purchasing an ineffective unit that will neither be safe nor comfortable to wear in the water.

The top factors to consider when purchasing a flotation belt for snorkeling are your body type and the intensity of the activity you are planning to use the belt for. Furthermore, you should also consider the material and cut of the belt, which will affect how comfortable it is to wear. Lastly, keep in mind the various belt styles to select from: even-buoyancy belts, uneven-buoyancy belts, and adjustable flotation belts, all of which support the body in different ways.

Body Size

The first thing to evaluate when researching a buoyancy belt is your body type: specifically, your structure and body density. Ask yourself these questions. Is your body broad and muscular? Or is it narrow and lean?

Additionally, who will be wearing the belt – an adult, teenager, or child? Some water ski belts are adjustable and can be shared amongst your family members. Just by asking yourself these questions, you can already get a good idea of the kind of swim belt to look for.

Next, the composition of fat and muscle in your body affects the type of belt you should buy as well. Fat is more buoyant, meaning it floats more easily than muscle. Therefore, lean and muscular individuals have trouble staying afloat and require belts that provide more buoyancy to compensate. People who have less muscle and a higher body fat percentage do not need to get a belt with as much buoyancy support.

Another factor to consider is the age of the individual wearing the belt. Even with adjustable belts, a child should not wear a belt intended for an adult because it might fit loosely and slip off in the water. However, teenagers who are still growing may be perfectly fine with a regular-sized swim belt since they are more likely to fit it than a kid’s belt, plus teenagers can grow into it as well. Always check how snug the water ski belt fits before taking it to the water.

Types of Water Ski Belts for Snorkeling

Even-Buoyancy Belts

An even-buoyancy belt provides an even distribution of foam around your waist, from the front, back, or sides, and helps you easily maintain an upright position. This type of belt is ideal for individuals with poor core strength and feel insecure in the water.

The Hydro-Fit Wave Belt is the picture perfect example of an even-buoyancy belt. It not only provides uniform foam distribution around your waist, but leaves your legs and arms free to move around and reduces drag. Since it can keep you afloat so easily, this belt is often worn by beginners, seniors, or individuals undergoing rehabilitation.

Unfortunately, since this belt keeps you afloat vertically, it can make it difficult to use for snorkeling along the surface.

Uneven-Buoyancy Belts

Yet another popular swim belt design is the uneven-buoyancy belt which typically features more foam around the back of the belt, and less on the sides and front. This higher cut on the back side is suitable for individuals that participate in advanced aqua cardio activities because it continually forces your body forward in the water. Swimmers and snorkelers can take advantage of this since they will naturally be leaning forward as they swim.

In order to remain vertical, one must activate their core muscles to do so. Thus, uneven-buoyancy belts help wearers engage in a great abdominal workout if they wish to remain upright. For snorkelers who plan on floating horizontally with their face looking down into the water, the uneven-buoyancy belt is a fantastic snorkeling belt. We recommend the Aquajogger for snorkelers and water aerobics enthusiasts that hope to incorporate core training into their daily activities.

Adjustable Water Ski Belts

The last type of belt are adjustable water ski belts. With adjustable belts, you can remove the closed cell foam blocks to let you decrease how buoyant the belt is. The square foam blocks are normally attached to the heavy-duty woven belt, however this adaptability is what lets it be a great tool to help beginners learning how to swim.

Snorkeling involves a great deal of swimming, so if you want to improve your swimming skills, consider investing in an adjustable flotation belt to help you practice in a pool. You can also use it to help you lose weight. The floats can be set up to provide an even distribution of buoyancy for newer water aerobics participants, or you can stack all of the foam blocks to the back to imitate the uneven-buoyancy belt.

An example of an adjustable swim belt is the Water Gear Instruction swim belt which features a modular design that lets you remove the foam blocks and is compatible with all kinds of body types and skill levels.

Comfort

Comfort should never be overlooked when you are selecting a buoyancy belt. Unless your snorkeling trips are incredibly short, you will probably be wearing it for several hours at a time. If the belt is uncomfortable enough that you’d rather not wear one and risk drowning, then that is a sign you didn’t consider the comfort aspect during your research.

The materials that a water ski belt is constructed from affect how comfortable it is to wear for long periods of time. Most flotation belts are basically a nylon belt with closed-cell foam attached to it. The foam is soft and buoyant and may be a little stuff the first few times you wear it. However, it should eventually soften as you break it in, and then you will feel like you’re wearing a soft cloud around your waist.

To ensure the optimal fit, check that the belt is long enough to wrap around your waist contour with some space to spare. You can always adjust how snug it fits using the adjustable strap, but it needs to be able to reach around your waist first. Too snug and you’ll feel like it’s cutting off blood flow and cutting into the skin. Too loose and you may feel a sense of freedom, but you run the risk of having it slip off while in the water.

Therefore, the ergonomics (how it is used by you), fit, and comfort are all crucial factors that affect how well the flotation belt will serve you.

buoyancy belt for snorkeling

Frequently Asked Questions

What is a Swim Belt Used For?

For those who are not confident in their swimming skills, a swim belt is an excellent tool to assist them with floating along the surface of the water. Furthermore, it is also great for older individuals or those with physical disabilities that need extra help staying afloat. Swim belts can also be training tools used by children or non-swimmers to get comfortable in the water in a safe environment.

Some common activities that you may see people use a swim belt for are snorkeling and water aerobics, as well as water-based training regimens. If you’re worried about whether you need to be a strong swimmer to snorkel, just keep in mind that while it is recommended, it isn’t strictly necessary with the help of a buoyancy aid and a snorkeling buddy.

Should I Wear a Flotation Belt for Snorkeling?

Yes, you can and should. It doesn’t matter if you are an experienced snorkeler or a non-swimmer who wants to try snorkeling. Not only does a swim belt help keep you from drowning, which is often a concern for non-swimmers, but it can help seasoned snorkelers conserve energy so that they can stay in the water for longer.

This lets them divert more of their energy and focus on what they truly want to do, which is to observe the underwater flora and fauna in peace. Furthermore, a buoyancy belt is not the only type of snorkel flotation device. You can also wear a life jacket or a snorkel vest to help you stay afloat in the water.

What is Water Aerobics?

Water aerobics, also known as aquatic fitness, is essentially a type of training regimen involving exercises done in shallow waters. They are often done in a swimming pool for the purpose of improving health by improving muscle strength and endurance, heart rate regulation, and lowering stress.

Beginner snorkelers may consider practicing water aerobics to improve their performance in the ocean and while snorkeling. Doing water-specific training will improve your overall skill and confidence in the water, allowing you to perform better when you’re out of the safety of a controlled environment such as the swimming pool.

Can I Use a Swim Belt for Water Aerobics?

Yes, you can use a swim belt for water aerobics and this is a great starting point to get accustomed to using a swim belt. Using a flotation belt frees up your arms when you are doing water aerobics. With this extra freedom, you can do all of the challenging exercises without thinking about how to stay afloat. You can get a greater workout and strengthen your body thanks to practicing this water resistance training.

Conclusion

Every snorkeler both new and old can get some benefit by using a water ski belt for snorkeling. As a newbie, you can get the confidence and protection you need to be in the water. You can also enjoy the underwater sights without reservation. Even seasoned water fitness practitioners and snorkelers can benefit by conserving more energy and snorkeling as long as they want.

A water ski belt for snorkeling is incredibly affordable, yet what it offers you is invaluable. The peace of mind that you get knowing that you’re protected and you can snorkel for significantly longer cannot be put into words, you must simply experience it for yourself. Lastly, they are very versatile, providing benefits to basically all water sports including snorkeling, and is something we highly recommend for all water fitness practitioners.

Best Snorkel Mask for Small and Narrow Faces

If a mask doesn’t seal tightly against your face, you can expect to have water leaks that limit how long you can snorkel and dive in peace. This problem is exacerbated when you have a small or narrow face and most snorkel masks don’t seem to fit your unique facial structure. Fortunately, there are snorkel masks for small and narrow faces on the market that are ideal for youth and adults with a small face.

In order to have the best seal, you have to get a mask that is suited to your facial structure, and the best snorkel mask for small faces should fit perfectly on smaller individuals. Furthermore, having a small mask is great for travel because of how lightweight and compact they are. Many of these masks are highly versatile and can be used to snorkel or dive for a long time without having to clear water due to their tight seal.

With that said, it can be difficult to know which snorkel masks are designed for small faces, and which are just regular snorkel masks that happened to fit someone with a small face. In this article, we review a selection of the best snorkel masks for narrow faces. We also go over how to find a snorkel mask that fits your face whether it’s small and narrow, and how you can also make an informed decision should you decide to shop on your own.

Our Top Picks:

Best Snorkel Mask for Small Faces Recommendations

Aqua Lung Technisub Micro-Mask

Aqua Lung MicroMask Double Lens Dive Mask
  • PADI Master Scuba Diving Instructor Owned and Operated.
  • This Product Comes Complete With A Full Manufacturer Warranty.

The Aqua Lung Technisub is a very popular mask among deep diving spearfishermen, and of course it’d do well for snorkeling as well. As the name suggests, this mask is very compact and lightweight, with a beautifully simple design. It almost appears to be a frameless mask, though technically it has a hard frame with a soft skirt that seals tightly on small faces.

Next, the Technisub has an extremely low volume, at nearly half of the volume as most of the masks on the market. This design helps keep the lens really close to the face, allowing its area of vision to be very wide. Additionally, the nose piece is easy to squeeze and reach with one hand. The skirt is soft, yet firm enough to seal tightly, though you may expect some lines to form on your face after a few hours.

As for the strap buckle, it is hinged and attached to the frame which aids in getting a good fit, but makes it less space efficient when folded away. If you find this mask fits your face like how many other customers with narrow faces have, then it will be worth the investment.

Pros:

  • Extremely low volume makes clearing a breeze.
  • Compact and lightweight.
  • The nose piece is easy to access for equalizing the pressure.

Cons:

Mares X-Vision Mid Mask

Mares X Vision Mid Size Scuba Mask-Black/Black-ONE
  • Ergonomic buckles on the skirt
  • Ideal for women, narrow faces, young divers
  • Light weight

The Mares X-Vision Mid Mask combines both excellent field of view with a comfortable fit on most small to medium faces. Experience snorkeling and diving with a mask that you’ll barely even feel it’s there, even if you normally have trouble finding a mask that is suitable for a narrower face.

Part of the reason why the Mares X-Vision is so comfortable is thanks to its hypoallergenic silicone skirt that can conform to the shape of numerous facial shapes, even those with a small or narrow face. The X-Vision provides a wide field of view due to the large single pane window as well as side view windows to expand your peripheral vision.

To further enhance your comfort, use the X-Vision’s easy-adjust buckles which are connected directly to the flexible silicone skirt, rather than the frame, that allows the mask to better conform to your facial structure. Lastly, the X-Vision also comes with a low profile protective case, and who can say no to freebies?

Pros:

  • Windows are angled optimally for the widest viewing angle.
  • Low internal volume which also keeps the lenses close to your face.
  • Conforms to numerous facial sizes, including smaller and narrower faces.
  • Easy-adjust buckles connected to the skirt, which provides greater comfort and hydrodynamics.
  • Includes a mask box.

Cons:

  • Some users noticed slight leaking by the nose bridge. Consider applying mask sealant to fix the issue.

Atomic SubFrame Mask

You know that a mask is durable when the manufacturer offers a lifetime warranty against frame breakage. The Atomic SubFrame Mask is touted as being the most durable, nearly indestructible two-window mask out of all of the masks on the market, with a hefty price tag to boot. What exactly makes it so strong?

For starters, it has an internal frame (a subframe) that is molded below the silicone rubber skirt. This gives it unmatched rigidity and strength, in addition to reducing the bulkiness that an external plastic frame would add. Additionally, the lenses are secured using stainless steel retainer locks which also support the bridge and nose area of the mask.

From the lenses, you can expect a great fit and a wide field of view that lets you see what the underwater world has to offer. It combines style, durability, and function effortlessly in one package. Despite the high price, the lifetime warranty takes away much of the risk, and it is a great choice for snorkelers who want an indestructible mask.

Pros:

  • Has a subframe which reduces the bulkiness and increases its durability to be one of the toughest masks on the market.
  • Wide field of view and great fit.
  • Squeeze to adjust buckles.
  • Lifetime warranty for frame breakage.

Cons:

  • Expensive.
  • Missing the ARC (anti-reflective technology) from the normal-sized version which increases light transmission and decreases reflected light for a crisper view.

Cressi Youth Scuba Diving

Cressi Mini Frameless, black
  • The frameless masks are loved by many snorkelers for their low-profile and comfort. The Mini Frameless is the kids' version of the popular Cressi F1....
  • Clear wide view by a single lens made with high quality tempered glass, anti-fog.
  • Made with 100% silicone, a better and longer lasting material than plastic PVC. The best for a perfect and comfortable seal.

While this mask may be marketed to kids, it can also be used by women or any adult who has a small face. Furthermore, Cressi is a well-established brand and you can’t really go wrong with their products. At under $30, the Cressi Youth is mighty tempting. Here are some features to tip you over the edge.

First, the mask is 100% constructed from silicone which is highly durable and also comfortable. In addition, the Cressi Youth is a frameless mask that provides great views and has a low volume. The Cressi Youth is versatile and can be used in the pool or open water for snorkeling, diving, and similar water activities.

Furthermore, the Cressi Youth is easily adjustable with its push-button swivel buckles to keep it secure on your face. Additionally, the single lens design provides an unobstructed view. Constructed of anti-fog tempered glass, the lens is resistant to fogging and is highly durable. And all of this for such an affordable price makes this an excellent choice for snorkelers that have a small face.

Pros:

  • Suitable for women, children, or anyone with a small face.
  • Competitively priced, highly affordable.
  • Provides great views and comfort.
  • Single lens made from anti-fog tempered glass.

Cons:

  • May still need you to treat it with anti-fog to ensure the lens will not fog up in the water.

Cressi Sub Lince

Cressi Lince, black/black
  • Mask features 100% silicone skirt with tempered glass lenses
  • Angled lenses for maximum vision
  • Designed And Created Using Innovative and Patented Manufacturing Technology

For all intents and purposes, the Cressi Sub Lince can be seen as a smaller version of the well-reviewed Cressi Matrix, due to its dimensions and volumes. Furthermore, it is designed similarly to Cressi’s Big Eyes, yet another exceptional product from which it takes many features such as its comfortable skirt designed for women and children, as well as unobstructed visibility.

In order to achieve this, the Cressi Sub Lince has very low internal volume, even by the standards of many free diving models, and even veteran free divers can get a sense of satisfaction wearing these. As for materials, the Lince mask is made completely from silicone, and features a hypoallergenic silicone skirt with a tempered glass lens. The result is that it is compact and lightweight.

Additionally, the materials help to provide its extreme comfort and clear visibility, as well as its efficient and modern strap system makes this model a strong contender for diving and snorkeling activities for those with a small face. Since this is Cressi we’re talking about, the price is slightly higher than other masks, however the product you’re getting is going to be quality.

Pros:

  • Extremely low internal volume.
  • Tempered glass lens with hypoallergenic skirt for more comfort.
  • Compact and lightweight.
  • Designed for women and children or anyone with a smaller face.

Cons:

  • Nose cutout may ride up and cause discomfort on your upper lip area.
  • Nose bridge can be tough to pinch.

Bare Duo Compact

It can be tough finding a snug fitting snorkel mask for those with a small face, and Bare understands this which is why they rolled out their Duo Compact mask for women and children. This mask features a double edge skirt that provides a tight seal on the face and keeps water out

Next, on the buckle you’ll find the push-button wide strap that lets you adjust the tightness of the strap on your face. The Bare Duo Compact is essentially a low volume mask with how easy it is to clear and its wide view. This mask features a twin-lens that is made from tempered glass which is durable and long-lasting.

Lastly, the nose pocket is soft and easy to squeeze with just one hand. This lets you easily perform an ear equalization even if you are wearing thick gloves. A solid snorkeling and dive mask for narrow faces.

Pros:

  • Double-edge skirt that seals well on narrow faces.
  • Easy to adjust push-button wide strap.
  • Twin lens offers excellent view and is constructed of tempered glass.
  • Has an easy to squeeze nose pocket, can be done one handed with gloves even.

Cons:

  • May need to treat it with an anti-fog solution to ensure there won’t be any fogging.

Scubapro Spectra Mini Mask

SCUBAPRO Spectra Mini Diving Mask with Mirrored Lens, Black
  • The Spectra Mini's mirrored dual lens design delivers a wide, glare-free view of the underwater world while reducing volume.
  • Designed to fit smaller faces, the Spectra Mini uses a smart double-sealed silicone skirt for optimum comfort.
  • Lenses are made from tempered glass for safety and long-term durability, and the ultra-clear no-tint glass delivers optimal clarity.

An ill-fitting mask can ruin a dive, and a person that has a smaller than average face knows this better than anyone. Even among those that have a small face, no two faces are alike. To address this, Scubapro have come out with the Spectra Mini mask that is intended to fit nearly everyone with a narrow face.

To begin, the Spectra Mini has a lower internal profile which can reduce the amount of surface area between the mask and the diver’s face. This is possible thanks to its dual tempered glass lens design, which is resistant to cracks and impacts. With the low volume, should water ever get inside, it is easier to clear than other masks.

Next, the Spectra Mini features a double feathered edge silicone rubber skirt. Its mask strap is designed for comfort and seals tightly due to its wide split style silicone construction. Furthermore, the dual lens on the mask allows wearers to experience the maximum intake of light for the clearest underwater vision possible. Re-pressurizing the mask has also been made easier with the one hand soft nose pocket. The Spectra Mini also includes an adjustable swivel buckle system.

Lastly, not only does the ScubaPro Spectra Mini look great, but it feels great to wear. When you’re out in the water snorkeling or diving, you need gear that is reliable and durable. The Spectra Mini fits that bill for avid water sports lovers that have a narrow face.

Pros:

  • Low internal volume.
  • Lens is made from dual tempered glass that is very durable.
  • Features a double feathered edge silicone rubber skirt that conforms to the face and is comfortable to boot.
  • Soft nose pocket makes it easy to equalize the pressure.

Cons:

  • Will need to apply some anti-fog treatment.

Tusa M-111 Mini Kleio II

TUSA M-111 Mini Kleio II Scuba Diving Mask, Black
  • Mask and Mask Box
  • Single Lens Design
  • Round-Edge Skirt for Maximum Fit and Comfort

The Tusa M-111 Mini Kleio II is for people with a smaller face that prefer their masks to fit snug. It’s in the medium price range, however it’s worth the money. First, the round-edge skirt is what helps it have such a snug fit and is highly comfortable to boot. The single lens design allows wearers to have a wide panoramic view of the underwater flora and fauna.

Next, the Tusa Mini Kleio II comes with a skirt-mounted buckle system that can be quickly adjusted for the optimal fit. You can expect this mask to fit small and medium faces, which is ideal for youth or female snorkelers. And thanks to its low volume, re-pressurizing is easy and you won’t have to worry about fogging as much.

Pros:

  • Round-edge skirt is comfortable and seals well on a narrow face.
  • Low volume design keeps the mask close to the face and makes it easy to re-pressurize.
  • Single lens design means no mask frame in the middle obstructing your view.

Cons:

  • Customers have no complaints!

Oceanic Mini Shadow

Sale
Oceanic Shadow and Mini Shadow Frameless Extremely Low Volume Design Scuba Ma...
  • Frameless design. No mask frame means the Shadow Series offers an incredible field of vision and pac
  • Soft nose for easy equalizing
  • Sleek 100% liquid silicone skirt attached directly to the tempered glass lens

If what you want is a high-quality mask and price is not a concern, then consider getting the Oceanic Mini Shadow. What makes it stand out is that it’s a frameless mask with very low volume, capable of folding nearly completely flat.

Since this mask has no frame, it also means that the mask stays close to your face and allows  you to have wide visibility and peripheral vision. It is the perfect companion if you want the best underwater sights or do photography.

Next, the lens is constructed using ultra-clear tempered optical safety glass, and the silicone skirt is made with medical-grade liquid silicone. With how versatile the skirt is, the Mini Shadow should conform to nearly all smaller faces.

Nothing is more irritating than having to stop your snorkeling session and clear your mask every few minutes. The Mini Shadow comes with an easily adjustable strap and buckle that can provide a snug fit, however these can be replaced with third party neoprene straps if you want the most comfort.

Pros:

  • Frameless design keeps the mask lightweight and offers one of the widest views.
  • Low volume design.
  • Easy to adjust swivel buckles.
  • Skirt is made from medical grade silicone for comfort and a tight seal.

Cons:

  • One of the more expensive masks.
  • Straps could be more comfortable.

SEAC Salina MD Mask

SEAC Salina MD S/KL Snorkeling Mask(Blue)
  • Country Of Origin : China
  • The Package Height Of The Product Is 1 Inches
  • The Package Length Of The Product Is 1 Inches

The SEAC Salina MD Mask is a very affordable and reliable product from an old and trusted brand. It may not be as mainstream or well-known as some of the other masks out there. But for around $20, it’s hard to beat what this mask is offering.

First, it has a single-lens design with the lens constructed from tempered glass. The skirt construction is specifically designed for smaller and narrower faces. Furthermore, it comes with an easy to adjust buckle system that is handy for tightening the mask and optimizing the fit. Thanks to the strap, you can even share the mask with your kids.

You might be worried about the prominent “SEAC” logo in the middle of the lens. Thankfully, when you’re actually wearing it you won’t notice it at all, nor does it get in the way of your field of vision. Next, the Salina MD comes with a purge valve, so even if there were to be a leak you can easily clear the water by exhaling through the nose. Overall, this is a comfortable mask for narrow faces at a great price.

Pros:

  • Provides a tight seal on slim faces.
  • Silicone skirt provides a comfortable fit.
  • Single tempered glass lens that is durable and offers a wide view.

Cons:

  • May be better suited for children, as some customers found it didn’t work so well for them but was excellent for their kids.

Snorkel Mask for Narrow Faces Buying Guide

Do you find yourself spending an inordinate amount of time messing around with your mask instead of enjoying the underwater sights? Unfortunately, if you have a small or narrow face, you’ve probably experienced this more times than normal. That’s why this section aims to provide you with tips on how to find the perfect fitting mask for you.

When you’re snorkeling or scuba diving, you shouldn’t be worrying about whether your mask is going to leak or start fogging up any second. With the right mask and proper treatment, these issues will be a thing of the past. By the time you’re finished reading this page, you’ll have all the knowledge you need to find the best snorkel mask for small faces.

How Should A Mask Fit?

Before you even think about any other factors, the number one most important consideration for a snorkel mask is how well it fits your face. The rubber-like portion of the mask that presses against your face and forms a watertight seal is known as the ‘skirt’. If the skirt has a strong seal, it will prevent common problems such as fogging, leaking, fatigue.

If your mask leaks, then either something is wrong with the skirt, or else the mask isn’t suited for your facial structure. People with small or narrow faces may find it difficult to get their mask to form a tight seal on their face. As a result, water slowly leaks through the skirt and gets in your eyes. In the worst case scenario, the mask can be so uncomfortable as to be painful.

Additionally, with an ill-fitting mask, you’ll have to waste precious time and energy treading water as you try to fix your mask problems. Treading water vertically is more tiring than doing it horizontally, so you are depleting your energy faster. Clearing the water also introduces a secondary problem.

By breaking the seal on your face, you will cause the mask to fog by allowing moist air to enter the mask, condensing against the cold on the surface of the lens. The more air that enters, the more moisture available to condense on your lens, resulting in fogging.

Next, never purchase a mask just because it looks fancy, has a high price tag, or is the “latest and most advanced” mask available. It can have all of the fancy features in the world, but none of that matters if it doesn’t fit your face properly.

How to Find a Properly Fitting Mask

The goal is to find a mask that is comfortable and seals against your face so well, you forget it’s even there when snorkeling. Everyone’s facial structure is unique, and yours might be smaller or narrower than most people’s. It is therefore hard to recommend a single mask as the “best” since that mask with over a thousand 5-star ratings might not fit on your face. Therefore, for each mask, try the following steps to see how well it fits.

Test the Skirt

When trying on a mask, stop breathing for a moment and place the mask against your face, making sure to press it lightly with your hand. Do not use the strap yet. Next, keep holding your breath but stop supporting the mask with your hand.

A mask that fits well should still remain on your face without you inhaling or holding it in place. During this test, it is important not to inhale because that creates suction. You can make nearly any mask stick to your face if you inhale through your nostrils hard enough, which defeats the purpose of this test.

Masks with skirts that seal tightly against your face are significantly less likely to let water through when you are snorkeling and moving your head through water. This quick test is easy to do and can help you determine if a mask will leak without even using it in water. If any mask fails this test, just move on to the next one.

Test the Strap

Moving on, we’re going to test the strap. A well-fitting mask should feel comfortable. It should stay on your face with relative ease, and you shouldn’t have to tighten the strap until it digs into your head. Only tighten the strap enough so that the mask will not shift even when you’re turning your head. The skirt should provide the majority of the seal for the mask, not the strap.

Dealing with Hair

The seal that the skirt provides can get compromised if strands of hair get in the way. People with long hair or facial hair often come across this issue. Dealing with facial hair can be a bit tricky, but there are ways to get a stronger seal with mustaches and beards. Worst case scenario, you might have to shave off a bit of the mustache.

It is difficult to deal with hair that’s caught under the skirt of the mask as you’re treading water. It’s also a waste of energy, so let’s try to keep this from happening. Before putting on the mask, wet your hair and slick it back. Now put on the mask, making sure to run your finger along the skirt to move any strands of hair out of the way.

Additional Snorkel Mask Considerations

Now that you’ve found a mask or two that fits, then we can finally start to consider other features that you may want. Just keep in mind that while having extra features are nice, all of the features below are secondary to getting a mask that properly fits your face.

  • A Wide Skirt: As you’re shopping for a mask, pay extra attention to the edge of the skirt. Remember, that’s the silicone or rubber portion that will seal against your face. They come in various widths, and you want one that’s wide. For the most part, the more of the skirt that touches your skin, the better the chance of a watertight seal.
  • Materials: If you’re going to buy a mask for yourself, make sure the skirt is made of silicone. Silicone will last for years and years, whereas rubber will degrade and crack over time.
  • Peripheral Visibility: While keeping your head still and with the mask on, move your eyes in all directions to check out how much peripheral vision you have. Some masks will make you feel tunnel-visioned. Others are reminiscent of looking out of a picture window. Whatever the case, I’m sure you’d rather have a mask that gives you the widest field of view.
  • No fog lens: Many brands advertise that their masks come with “no fog” lenses. This is a bit of a stretch, as no mask lenses are completely fog-free, and more like low fog, which doesn’t sound as good for marketing purposes. Even if you purchase a no fog mask, expect to treat your mask lenses yourself to ensure they remain crystal clear.
  • Vision Enhancing Coatings: Some lenses are designed to improve underwater clarity during subpar light conditions. That almost makes you sound like you’re a Navy SEAL or something. But how this works is that a special tinting on the lenses makes the images sharper and clearer by reducing glare and filtering specific wavelengths of incoming light. The end result is that you can see slightly better underwater. Very few masks have this and it’s not that important, though it should be mentioned just for the record.
  • Low Volume: You should get a low volume snorkeling mask. Why? Well, if you plan on freediving at all, you should know that the deeper you dive the more pressure there is in the mask. And the more pressure there is, the more you have to exhale through your nose to equalize the pressure in your mask. Low volume masks are designed such that the lens is as close to your face as possible, lowering the air volume inside. With less air volume, you don’t have to exhale as much, letting you save your breath. Furthermore, the less you exhale, the lower the likelihood of your lenses fogging up.

How to Keep Your Small Snorkel Mask from Fogging

Since you’ll be wearing a smaller snorkel mask, it will have a lower volume than other snorkel masks which will make it less likely to fog as we explained above. However, let’s not rely on luck and figure out how definitively prevent a snorkel mask from fogging.

Make Sure the Mask Fits

Hopefully we’ve successfully drilled this into your head by now, unless you’ve been skipping some of the sections above. If so, we recommend you read the “How to Find a Properly Fitting Mask” section again. But essentially, you don’t want water to enter, forcing you to take off your mask to clear it.

Try Not To Take Off Your Mask

The rule of thumb is that once you put on your mask, you should leave it on for as long as you can. Taking off your mask introduces new moist air, and this moisture condenses on your lens resulting in fogging. For the same reason, try not to exhale through your nose too much. Only do what is necessary to re-pressurize the mask (see our section on Low Volume for more details) and no more.

Use Mask Defog

Mask Defog is any product or substance that you can use on the inside of your mask lens to prevent condensation, which keeps it from fogging up. Snorkel mask defogging solutions are relatively cheap and work well. They are also widely available at any dive shop and can be ordered online as well.

If you don’t have mask defog with you, a quick and dirty way is to use your spit to clean your lenses. Make sure to rinse it off after and shake off as much water as you can. Dry it with a towel if possible to remove as much moisture as you can. Even with mask defog, you have to keep in mind not to take off your mask once you put it on.

Pro Tip: If you feel like the defog solutions offered in your dive shops are too expensive for your liking, you can try using a car windshield cleaner. These should be available in all automotive supply stores, or even at the nearest gas station or Walmart. It should be packaged in a squirt bottle which makes it super convenient to apply to your snorkel mask lens. Windshield cleaner is incredibly cheap and a bottle lasts about a year. Just squirt the product on the mask lens, rub it around with a towel (don’t use your fingers because the oil on your fingertips can transfer to the mask lens), rinse the excess solution with water, and dry again before putting it on.

You’ll be amazed at how effectively these simple steps can prevent fogging and enhance your snorkeling experience.

Parting Words

Regardless of your facial structure, whether you have a small or narrow face, or a large and wide face, as long as you know how to test a mask to see how well it fits you, it is only a matter of time until you find the perfect one for your face. We highly recommend you purchase a mask for yourself instead of renting, particularly if you have a narrow face because their mask selection may not fit for you. You will end up wasting a lot of time each trip just trying out different masks.

It is better to do any trial and error right now and find a good “mini” mask for you. In this article, we reviewed the 10 best snorkel masks for small faces currently on the market to give you a good starting point. We personally recommend sticking with a trusted brand, such as Cressi or Atomic Aquatics. However, there are also a few surprising budget options for lesser known brands that can serve you well for the price.

Once you finally get a mask that fits comfortably on your face and doesn’t leak, you will be glad you spent the time doing the research. Since these masks can last for years, we recommend you treat it as a long-term investment and don’t be afraid to pay a bit more for a high-quality mask.